You’ve signed up for web hosting, but now what? Now you need to install WordPress!
Knowing how to install WordPress is the next crucial step before your website or blog can go live. But it can be scary, especially if you’ve never done it before.
In this guide, I’ll walk you through simple, step-by-step instructions—from one-click installation to a manual overview—and show you exactly what to do immediately after WordPress is installed. By the end, you’ll have a secure, functional site ready to customize and grow.
Following these steps ensures your WordPress site is secure, functional, and ready to grow.
Final Thoughts
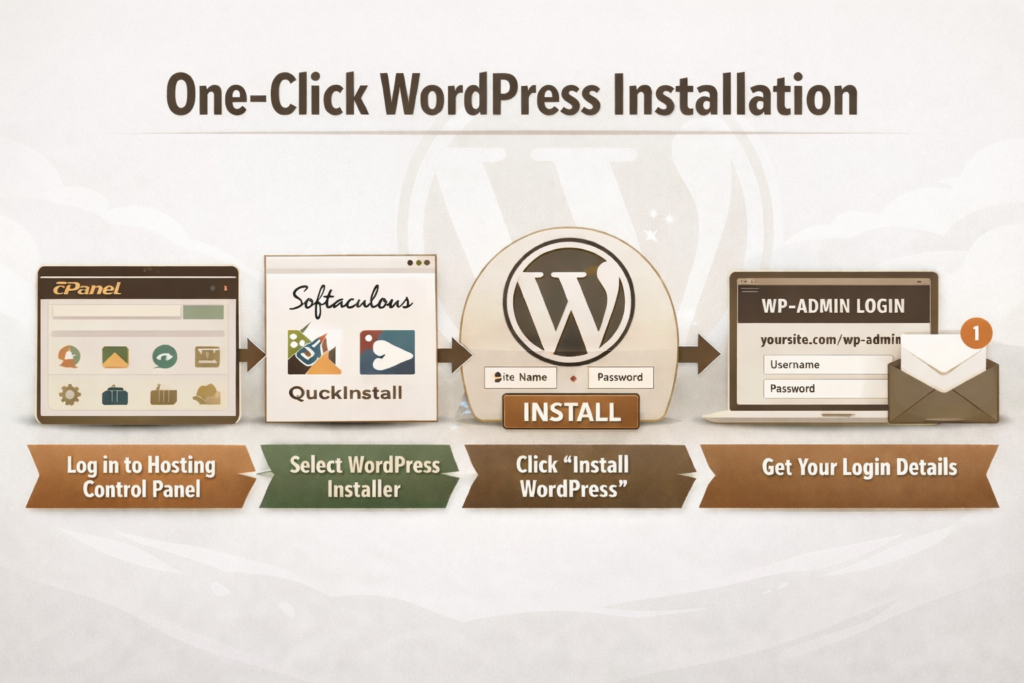
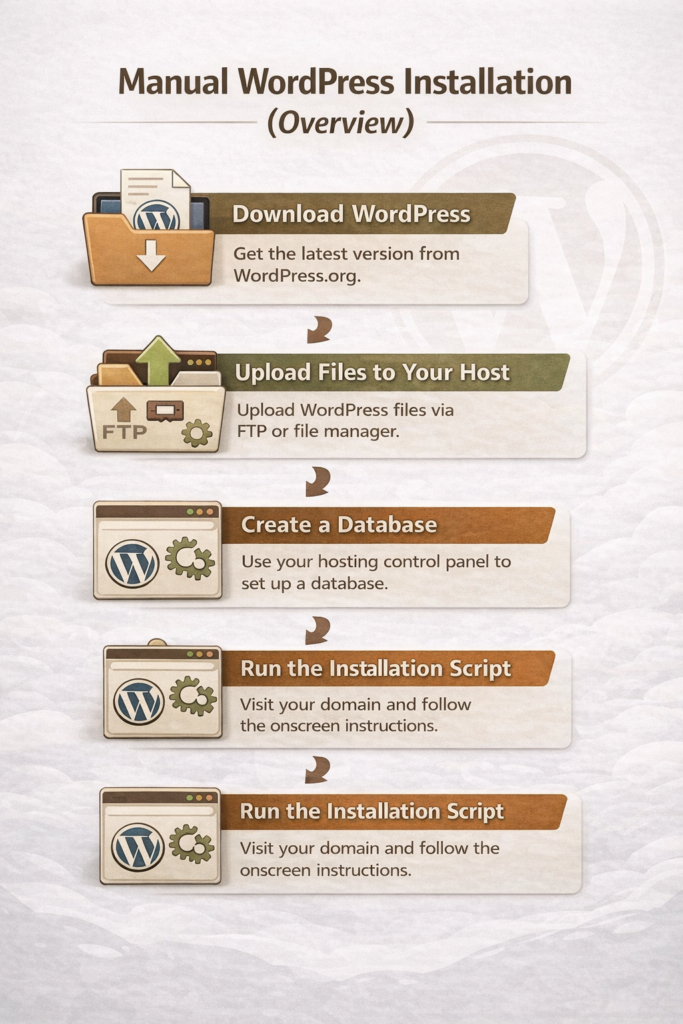
Installing WordPress can feel intimidating at first, especially when you’re not sure what the “next step” is after signing up for hosting. The good news is that most beginners can get up and running quickly using a one-click installation, and even the manual option is manageable when you understand the process at a high level.
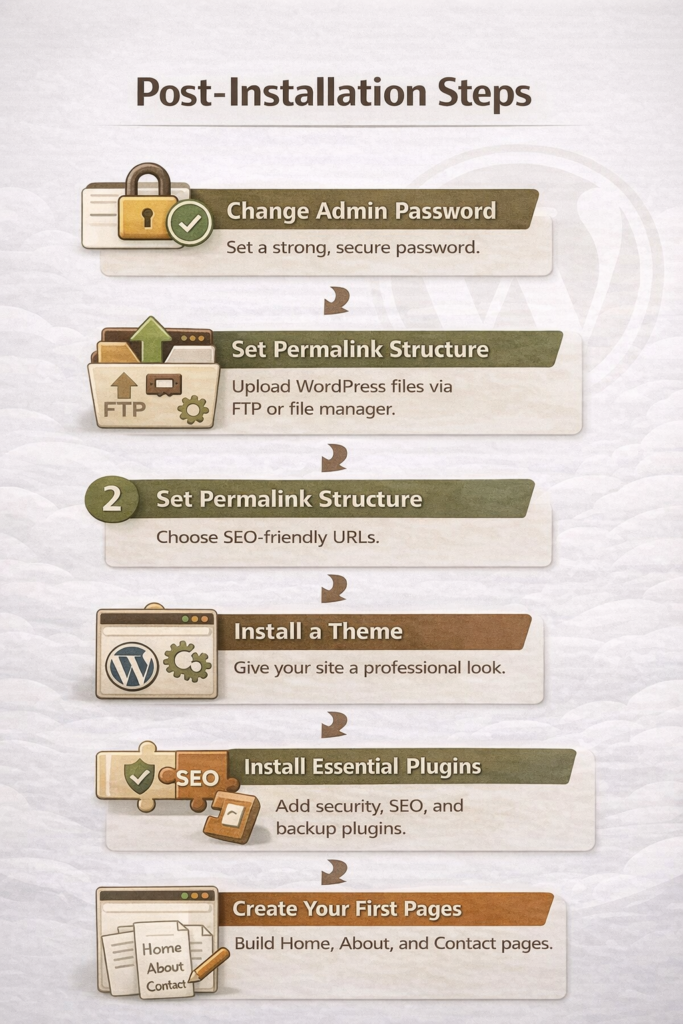
Once WordPress is installed, the real work begins—setting up your site, securing it, and creating content that serves your readers well. Take your time, follow the steps in this guide, and remember that you don’t need to do everything perfectly on day one. A simple, functional site is far better than waiting indefinitely for the “perfect” setup.
The best hosting for beginner WordPress blogs is one that’s easy to use, affordable, and backed by reliable support, so you can focus on learning how to blog, not fixing technical issues.
Post contains affiliate links.
When you’re starting a blog for the first time, hosting can feel like an overwhelming decision. Every company promises speed, security, and “the best WordPress experience,” but no one really explains what matters for beginners. Many new bloggers sign up for a host without realizing how confusing the setup can be or how much prices increase after the first year.
My goal is to help you build a solid foundation without unnecessary stress. Your hosting choice plays a big role in how smooth your WordPress experience will be, especially in the early stages when you’re learning the basics and building confidence.
In this guide, we’ll walk through the best hosting for beginner WordPress blogs, sharing honest pros and cons, beginner-friendly recommendations, and what to look for so you can choose a hosting provider that supports your blog as it grows.
What Beginner WordPress Bloggers Need From a Hosting Provider
When you’re new to blogging, hosting should make WordPress feel simple. It shouldn’t be stressful. The best WordPress hosting for beginners focuses on ease, support, and value instead of advanced features you won’t use yet.
Ease of Setup (1-Click WordPress Install, Dashboards)
Beginner-friendly hosting should make getting started quick and simple. Look for a 1-click WordPress install and a clean dashboard that’s easy to understand. You shouldn’t need technical knowledge just to publish your first post.
Price vs. Long-Term Value
Many hosting plans look cheap at first, but become expensive when it’s time to renew. The best WordPress hosting for beginners is affordable up front and reasonably priced long term. Always check renewal rates before signing up.
Customer Support for Non-Tech Users
Good support is important. You want to have someone helpful available when something goes wrong. Look for a hosting provider that offers 24/7 support with clear, patient answers, especially through live chat. You shouldn’t feel embarrassed about asking basic questions.
Performance Basics (Speed, Uptime, Security)
You don’t need advanced performance tools as a beginner, but the basics matter. Good hosting should keep your site fast, online, and secure. Features like free SSL, reliable uptime, and basic security protection are essential from day one.
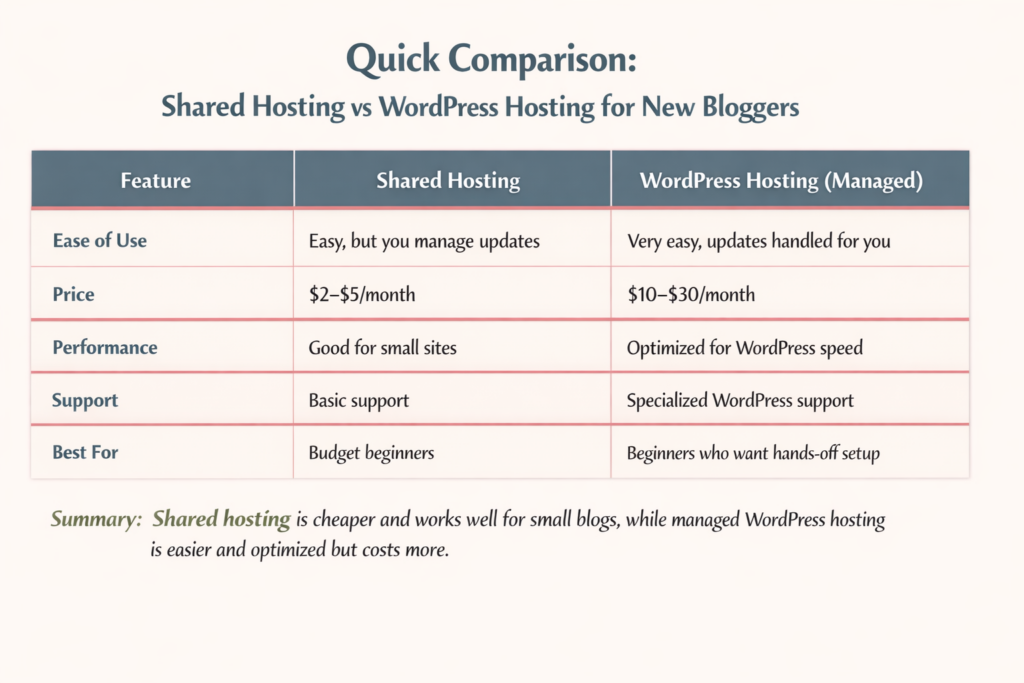
Quick Comparison: Best WordPress Hosting for Beginners
Starting a WordPress blog can be confusing, especially when you see all the hosting options. Let’s break down the most common types so you can make the best choice for your first blog.
Which Option Is Best If You’re Just Starting Out?
If you’re just learning and want to keep costs low, shared hosting is usually enough. If you want the simplest setup, don’t mind paying more, and want WordPress handled automatically, managed WordPress hosting is worth it.
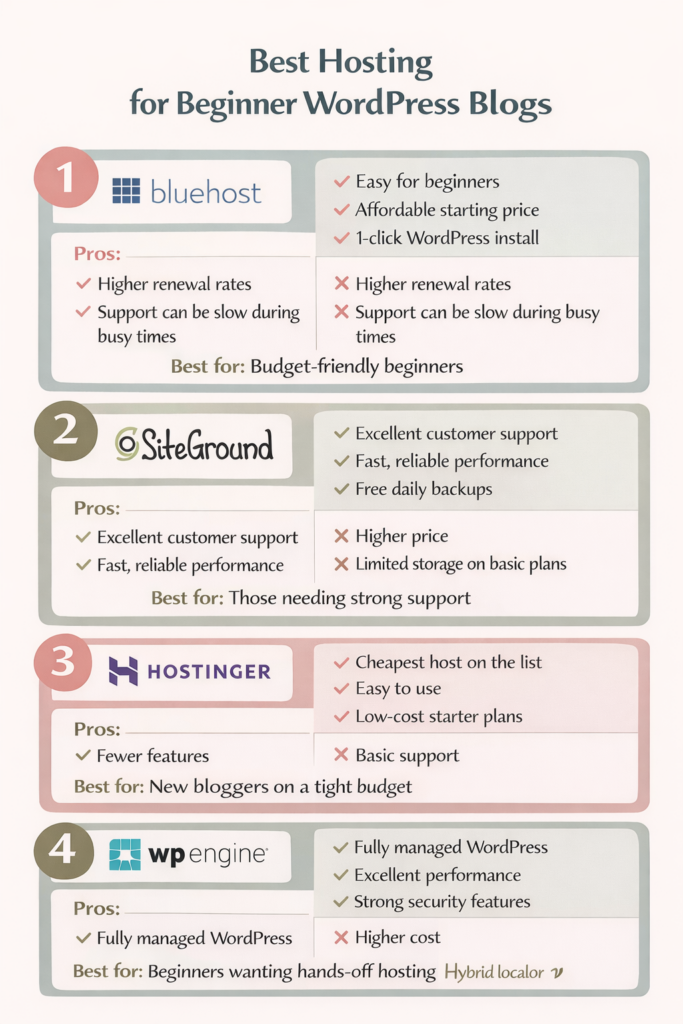
Best Hosting for Beginner WordPress Blogs — Top Picks Reviewed
Not all hosting is created equal, especially for beginners. Here’s a quick look at the most popular options for new WordPress bloggers, with honest pros and cons to help you choose the right one for your needs.
Best for: Beginners who want strong support and reliable performance.
Hostinger — Cheapest WordPress Hosting for Beginners
Pros:
Very low starting price
Easy WordPress setup
Simple control panel
Cons:
Fewer features than higher-tier hosts
Support not as extensive as SiteGround or WP Engine
Best for: Bloggers starting with minimal investment who want to keep costs low.
WP Engine — Is Managed WordPress Hosting Worth It for Beginners?
Pros:
Fully managed WordPress hosting (updates, backups handled for you)
Excellent performance and security
Focused WordPress support
Cons:
Higher cost than shared hosting
Overkill for very small or hobby blogs
Best for: Bloggers who want a hands-off experience and have the budget for premium support.
WordPress Hosting Pros and Cons for Beginners
Choosing the right WordPress hosting can make or break your first blogging experience. Here’s a quick look at the main advantages and disadvantages for beginners so you can make a decision you can feel confident with.
Pros of Beginner-Friendly WordPress Hosting
Easy setup: Many hosts offer 1-click WordPress installation, so you can start blogging quickly.
Beginner-focused support: 24/7 chat and guided tutorials help you solve problems fast.
Optimized performance: Good hosts keep your site fast, secure, and reliable.
Affordable options: Shared hosting or starter plans make it easy to start on a budget.
Built-in tools: Features like free SSL, daily backups, and simple dashboards simplify site management.
Cons New Bloggers Should Be Aware Of
Renewal rates can jump: A lot of hosts offer low introductory prices that increase after the first term.
Overwhelming choices: Too many features or tiers are confusing.
Limited storage or bandwidth: Budget plans may restrict space or traffic as your blog grows.
Learning curve remains: Even beginner-friendly hosts still require some technical steps, like installing themes or plugins.
Support limits: Some budget hosts offer basic support, which may be slower or less detailed than premium options.
Common Hosting Mistakes Beginner Bloggers Make
Even with the best WordPress hosting for beginners, it’s easy to make mistakes that can slow down your blog or cost more than expected. Here are the most common pitfalls and how to avoid them.
Choosing Price Over Support
Sometimes new bloggers pick the cheapest host without considering support. If something breaks and help is slow, a low price can quickly cost you hours of frustration. Choose a host that balances affordability with responsive, beginner-friendly support.
Ignoring Renewal Rates
Introductory pricing can be tempting, but most hosts raise their rates after the first year. Always check the renewal price before signing up so you won’t be surprised later.
Overbuying Features You Don’t Need
Some hosting plans include fancy extras like advanced caching, staging sites, or premium security. As a beginner, these features can be confusing and unnecessary. Start simple. You can always upgrade later.
Skipping Backups or Security Checks
Even beginner-friendly hosting can’t protect you from mistakes or attacks if you don’t enable backups or security measures. Make sure your host offers automatic backups and SSL certificates, and learn the basics of WordPress security.
How to Choose the Best WordPress Hosting for Beginners (Step-by-Step)
Don’t stress over choosing the best hosting for beginner WordPress blogs. Don’t let it overwhelm you! Focus on the basics, and you’ll find a host that supports your blog instead of slowing you down.
1. Start With Your Blog Goals
What do you want from your blog? Do you just want a hobby blog? Are you planning to grow a full-time site? Your goals will determine whether shared hosting is enough or if managed WordPress hosting makes more sense for you.
2. Decide How Much Tech You Want to Handle
Some hosts handle everything for you, like updates and security. Others give you more control but require hands-on management. Choose the option that matches your comfort level with WordPress and technical tasks.
3. Match Hosting to Your Budget and Growth Plans
Look at both the starting price and renewal cost. Make sure the plan gives you room to grow, including enough storage, traffic allowance, and essential features like SSL certificates and backups.
4. Check Support and Resources
Even the best host is useless if you get stuck and can’t get help. Beginner-friendly hosting should offer 24/7 support, live chat, and clear tutorials to guide you through setup and troubleshooting.
Final Thoughts
The best WordPress hosting for beginners balances ease of use, affordability, and support. Take your time, compare options, and choose a host that makes blogging fun, not stressful!
Honestly, choosing a domain name for my blog was the hardest decision I had to make about blogging! I wanted it to be something that was easy to remember and reflected exactly what my blog was about.
Everything I came up with was either taken, sounded too clever, or was too boring. Plus, I wanted something that I was going to stick with and not outgrow within a year or two.
Since your domain name becomes your blog’s permanent home, it’s not a decision you want to rush.
Guess what: You don’t need the perfect domain name. You need a strategic one.
This guide will walk you through how to choose a domain name for your blog, including common mistakes to avoid, branding vs. SEO tradeoffs, and when keywords help (or hurt) your long-term growth.
*Post may include affiliate links.
What a Good Blog Domain Name Actually Does
Your domain name should:
Be easy to remember
Be easy to spell
Reflect your blog’s purpose or brand
Give you room to grow
What it does not need to do is explain everything you’ll ever write about.
A lot of bloggers regret their domain name because they chose something too narrow, too trendy, or too SEO-focused without thinking long-term.
Here are some clever examples based on the type of niche your blog is about:
Homesteading: TheGentleHomestead.com
Simply Living: RootedatHome.com
Writing: QuietDraft.com
Crafts: TheIntentionalCrafter.com
Health & Wellness: BalancedByDesign.com
Personal Finance: CalmMoneyHabits.com
Frugal Living: LivingOnLess.com
Parenting & Family Life: GrowingTogetherHome.com
Education: TheCuriousTeacher.com
Or you could simply choose a domain name by using your name. Or mix your name with a simple description of what your blog is about: MichelleMillerProofreading.
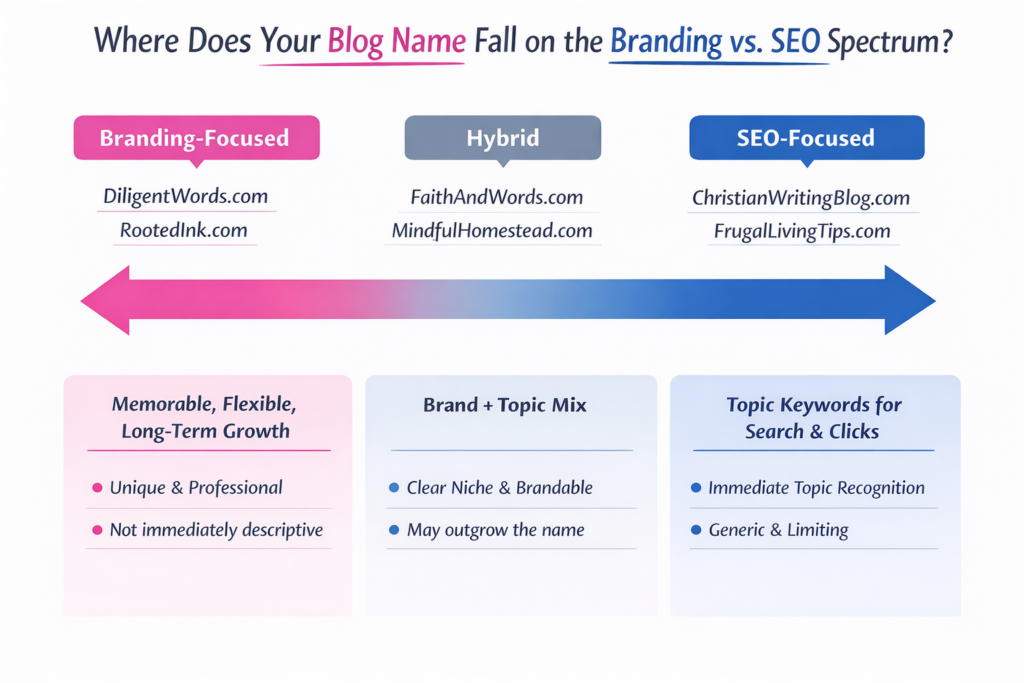
Branding vs. SEO: The Tradeoff You Need to Understand
This is where most bloggers get stuck when they sit down to choose a domain name. Should you go for something that immediately signals their topic for search engines, or choose something that feels memorable? It’s important to understand the difference between branding and SEO.
What Branding-Focused Domains Do
A brand-focused domain is designed to be memorable, flexible, and unique. It tells readers who you are, not just what you write about. These names are easy to say out loud, look professional, and give you room to expand your blog in the future.
Examples:
DiligentWords.com – works for writing, editing, or teaching.
RootedInk.com – broad enough to cover multiple content types while still feeling creative.
The benefit: Branding domains age well. Even if your blog topic evolves, your name still makes sense.
The tradeoff: It may not immediately tell a new visitor exactly what your blog is about. You’ll need strong messaging elsewhere—like your tagline, About page, or content titles.
What SEO-Focused Domains Do
An SEO-focused domain leans on keywords to signal your topic. These often describe exactly what the blog covers, which can help with search clarity and click-throughs early on.
Examples:
FrugalLivingTips.com – instantly communicates the blog’s focus.
ChristianWritingBlog.com – makes the niche crystal clear.
The benefit: Clear keyword signaling can help attract the right audience quickly and may give a small boost in search visibility.
The tradeoff: These domains can feel generic, limit your growth if you expand topics, and make it harder to stand out in a crowded market.
How to Decide Which Way to Go
Think of it as a range rather than an either/or choice:
If your goal is long-term brand recognition, prioritize branding.
If your goal is immediate search clarity, keywords can help, but don’t overstuff your domain.
A hybrid approach works too: blend a soft keyword into a brandable name (e.g., FaithAndWords.com).
Tip: Search engines care far more about quality content, structure, and consistency than your exact domain name. Prioritize readability, memorability, and brand potential. SEO will follow if your content is strong.
When Keywords in a Domain Name Help—and When They Hurt
If used wisely, keywords can still be useful.
Keywords Help When:
They naturally fit your brand name
They describe your core topic without boxing you in
They don’t make the domain long or awkward
Keywords Hurt When:
They make the domain clunky or hard to remember
They lock you into a single content angle
They sound like every other blog in your niche
If your domain reads like a search query instead of a brand, that’s a red flag.
This is one of the easiest mistakes to avoid when you choose a domain name, and one of the most common. Hyphens and numbers may seem like a quick fix when your preferred domain is taken, but they usually create more problems than they solve.
Your domain name should be easy to remember, type, and share. Hyphens and numbers work against all three.
Avoid Hyphens Because:
They’re hard to say out loud. If you ever tell someone your blog name in conversation, on a podcast, or during a presentation, hyphens instantly add friction. “It’s myblog dash name dot com” is awkward. And easy to forget.
People forget where they go. Even when someone hears your domain correctly, they often forget whether there was a hyphen or where it belongs. That confusion sends potential readers to the wrong site, or nowhere at all.
They increase the risk of typos. Hyphens make domains harder to type quickly, especially on mobile devices. More keystrokes mean more opportunities for errors, which can cost you traffic and credibility.
Avoid Numbers Because:
Are they spelled out or numeric? When someone hears your domain name, they have to guess: is it “five” or “5”?
They confuse readers. Numbers interrupt the natural flow of a name and make it harder to remember. A domain should roll off the tongue.
They often look spammy or dated. Domains with numbers are commonly associated with low-quality sites, temporary projects, or marketing shortcuts. Even if your content is excellent, the name can create an unnecessary trust barrier.
How to Generate Blog Domain Name Ideas
If you’re stuck, try these approaches:
Combine two relevant concepts (faith + writing, home + simplicity)
Use metaphors or imagery related to your topic
Look for words that reflect tone, not just topic
Start with your name if personal branding makes sense
Write down 10–20 ideas before checking availability. Walk away for a little while, or even a day or two, and come back to the list later. That way, you see it with fresh eyes, and the name you thought you liked yesterday may not be the one you love today.
Domain ownership: Some platforms offer a free domain as part of their plan, but there’s usually some strings attached. You may not fully own the domain, or it may be tied to the platform in a way that makes moving your site later more complicated.
Customization and branding: Your platform determines how much control you have over your site’s design, layout, and functionality. If your domain name is brand-focused, you’ll want a platform that allows you to fully customize how that brand is presented.
Long-term flexibility: Many bloggers outgrow their first platform. If you choose a platform that limits monetization, plugins, or site structure, your domain can feel trapped, even if the name itself is solid.
A Simple Domain Name Checklist
Before you buy, ask yourself:
Can I say this out loud without explaining it?
Would I still like this name in five years?
Does it give me room to grow?
Is it easy to spell and type?
Does it sound like a brand—not a keyword list?
If you can say yes to most of these, you’re on the right track.
Final Thoughts
Choosing a domain name doesn’t have to be stressful, but it should be intentional.
You’re not just picking a URL. You’re choosing the foundation your blog will grow on. Aim for clarity, flexibility, and longevity, and you’ll save yourself a rebrand down the road.
Years ago, when I started my first blog, I remember thinking, Why are there two WordPresses? I Googled: “How do I start a blog,” and somehow ended up buried under tons of articles about WordPress.com vs WordPress.org. Every one of them seemed to assume I already knew what hosting was, what plugins did, and why one option cost money while the other didn’t. I just wanted to write.
What made it more frustrating was that everyone had an opinion. Some people swore WordPress.com was easier. Others insisted WordPress.org was the only “real” way to blog.
But, the deeper I dug, the more the question shifted from “How do I start a blog?” to “WordPress.com or WordPress.org—which one am I supposed to choose?”
Are you feeling that same confusion right now? These two platforms may share a name, but they are designed for very different types of bloggers and website owners. Choosing the wrong one can limit you to constraints you didn’t even know existed, while selecting the right one can make everything that follows much smoother.
In this guide, I will walk you through WordPress.com vs WordPress.org in plain language—what they are, how they differ, and who each one is really for—so you can confidently decide which type of WordPress is the right foundation for the blog or website you want to build.
*post may contain affiliate links
What Is WordPress.com?
WordPress.com is a hosted blogging platform. That means everything you need to run your site is handled for you. You do not have to buy hosting, install software, or manage technical settings. You simply create an account, pick a design, and start writing.
WordPress.com bundles everything together for you:
Hosting (where your website lives)
Security
Software updates
Backups
Basic site maintenance
Because it is all built in, there is nothing for you to install. You log in through your browser and work on your site, much like using a social media platform or an online writing tool.
The free plan lets you start a blog with very little setup, but it comes with limits. Your site will have WordPress branding, a long web address (like yourblog.wordpress.com), and fewer features.
Paid plans give you more control. You can use a custom domain (like yourblog.com), remove WordPress ads, and unlock more design and business tools. The higher the plan, the more features you get.
Who Owns the Site?
With WordPress.com, you do not completely own your website. WordPress hosts it for you and controls the platform. This means they can set rules about what you can post, how you can make money, and which features you can use.
Your content belongs to you, but the website itself lives on their system.
What You Can and Cannot Customize
WordPress.com allows some design changes, but it is limited. You can:
Choose from approved themes
Change colors and fonts
Add basic pages and menus
You cannot:
Install most plugins
Edit core site files
Fully customize how the site works
This keeps things simple, but it also limits how much your site can grow.
Why Beginners Are Drawn to WordPress.com
Many beginners choose WordPress.com because it feels easy and safe. There is no hosting to set up, no software to install, and nothing to maintain. If you just want to start writing and do not want to deal with tech, WordPress.com can feel like the quickest path forward.
However, that simplicity comes with trade-offs, which is why it is important to understand how it compares to WordPress.org before you choose.
What Is WordPress.org?
WordPress.org is not a company, and it is not a paid blogging service. It is the home of self-hosted WordPress, which means you download the WordPress software and install it on your own web hosting. This is why people often call it self-hosted WordPress.
With WordPress.org, you are building your website on space you rent from a hosting company. WordPress is the software that runs the site, but you control everything.
This setup gives you full control over how your site looks, how it works, and how it grows.
What Is Hosting?
Think of hosting as the land where your website lives. Your blog files, images, and content have to be stored somewhere so people can see them online. A hosting company provides that space and keeps your site available on the internet.
With WordPress.org hosting, you choose the company that holds your site, and you can move it, upgrade it, or change providers anytime. This is a big difference from WordPress.com, where everything is locked into their system.
Why Most Professional Websites Use WordPress.org
Most professional bloggers, businesses, and online stores use WordPress.org because it gives them freedom and control. You can:
Install any WordPress plugin
Customize your site however you want
Optimize for SEO
Run ads, sell products, or build an email list
Change hosts as your site grows
This is why WordPress.org is often called the best option for people who want to turn their blog into something bigger over time.
WordPress.com vs WordPress.org: The Main Difference
WordPress.com vs WordPress.org can be very confusing. The easiest way to understand it is this:
WordPress.com is a hosted platform. Everything is handled for you—hosting, updates, security, and backups. You log in and write, but you are limited in customization and control.
WordPress.org is self-hosted. You download the WordPress software and install it on your own hosting. You own your website, choose your themes and plugins, and can fully customize your site.
Think of it like renting versus owning:
WordPress.com is like renting an apartment. The landlord handles maintenance, but you must follow their rules.
WordPress.org is like owning a house. You make all the decisions, but you are responsible for maintenance and upgrades.
Why This Difference Matters
Choosing the right platform affects everything else about your blog or website:
Customization: With WordPress.org, you can install any plugin or design your site however you want. WordPress.com is more limited.
Monetization: WordPress.org lets you run ads, sell products, and use affiliate links freely. WordPress.com has restrictions unless you pay for higher plans.
SEO and Growth: WordPress.org gives you full control over SEO tools, site speed, and content structure. WordPress.com is easier to start, but it can limit your growth.
Understanding the differences early saves headaches later. If your goal is a simple hobby blog, WordPress.com might be enough. But if you want a blog that grows, attracts traffic, and can eventually make money, WordPress.org is usually the better choice.
Who WordPress.com Is Really For
Not everyone needs full control over their website. WordPress.com is designed for people who want a simple, low-maintenance way to get online. It is perfect for those who just want to write and publish without worrying about hosting, plugins, or technical details.
Here are the types of people who often choose WordPress.com:
Hobby bloggers – If you’re blogging for fun and don’t care about growing a big audience, WordPress.com is an easy place to start.
Personal journals – People who want to share thoughts, experiences, or family updates without needing a professional website often find WordPress.com ideal.
People who never want to touch tech – WordPress.com handles hosting, backups, and updates for you, so you can focus entirely on writing.
Writers who just want to publish – If your goal is simply to put your content online and you don’t care about SEO, traffic, or monetization, WordPress.com covers all the basics.
In other words, WordPress.com is for anyone who wants a simple, hassle-free blogging experience. It’s easy to start, beginner-friendly, and lets you focus on writing rather than technical setup.
Who WordPress.org Is Really For
If you want your blog or website to grow beyond just writing, WordPress.org is usually the better choice. This platform is for anyone who is serious about building traffic, connecting with an audience, and turning their site into a long-term asset.
Here’s who often benefits most from self-hosted WordPress (WordPress.org):
Bloggers who want traffic, email lists, or income – WordPress.org gives you full control over SEO, email marketing, and monetization, so you can grow your audience and turn your blog into a source of revenue.
Freelancers, creators, and business owners – You can customize your site, run ads, sell products or services, and create a professional online presence.
Anyone serious about growing a brand or platform – With WordPress.org, your website is fully yours. You choose your host, install plugins, and scale your site as your goals expand.
Build email lists to connect directly with your audience
Sell products or services without restrictions
Maintain long-term site ownership, giving you freedom and flexibility to change hosts, redesign your site, or expand features
In other words, if you want more than a simple blog (if your goal is growth, control, and the ability to monetize), WordPress.org is the platform that makes it possible. This is why many professional bloggers and small businesses choose it over WordPress.com.
Which One Should You Choose?
When it comes to WordPress.com vs WordPress.org, the right choice depends on your goals, skills, and how much control you want over your site. Here’s a simple framework to help you decide:
If you want simplicity: Choose WordPress.com. It’s easy to start, beginner-friendly, and takes care of hosting, security, and updates for you. You can focus entirely on writing without worrying about technical setup.
If you want growth: Choose WordPress.org. This self-hosted platform gives you full control over your site, allows you to install plugins, customize your design, optimize for SEO, build email lists, and monetize your blog. It’s the better option if you want to grow your audience or turn your blog into a long-term platform.
A Common Beginner Mistake
As a new blogger, I started on WordPress.com because I thought it was easier. I only wanted to write for fun at first, but then I started gaining a lot of followers. I realized that I could start making money with my blog, and I wanted more control and features. I needed to move my site to WordPress.org, which was complicated, time-consuming, and a little costly. Plus, I had heard horror stories from other bloggers who did this and lost all their posts.
By thinking ahead and choosing the right platform from the start, you can avoid headaches and set your blog up for long-term success. Choosing between WordPress.com or WordPress.org early ensures your site can grow with your goals, rather than holding you back.
Final Thoughts
Choosing between WordPress.com vs WordPress.org is one of the most important decisions you’ll make when starting a blog. There isn’t a “one-size-fits-all” answer. It all comes down to your goals, how much control you want, and how far you want your blog or website to grow.
If you want simplicity, quick setup, and minimal technical work, WordPress.com is a solid choice. It’s perfect for hobby bloggers, personal journals, or anyone who just wants to write without worrying about hosting or plugins.
If your goal is growth, traffic, and long-term ownership, WordPress.org is usually the better option. Self-hosted WordPress gives you freedom to customize, optimize for SEO, build email lists, sell products, and fully control your site as your blog or business expands.
The key is to make this decision early, because switching later from WordPress.com to WordPress.org can be tricky and time-consuming.
Take a minute to think about what you want your blog to look like six months, a year, or even five years from now. By choosing the right platform from the start, you’re setting yourself up for a smoother journey and a blog that can grow with your goals.
For a step-by-step guide on setting up your blog after you make this decision, check out my guide: How to Start a Blog from Scratch. It walks you through everything from domain names to writing your first post.
Starting a blog can feel overwhelming, especially if you’ve never done it before and aren’t sure where to begin. If you’re wondering how to start a blog from scratch in 2026, you’re not alone. With so many platforms, tools, and opinions available, it’s easy to get stuck before you even publish your first post.
I’ve got good news! Blogging is still one of the most accessible ways to build an online presence, share your expertise, and create an income stream. You don’t need to be tech-savvy, have a large following, or spend months planning. What you do need is a clear, beginner-friendly roadmap that walks you through each step without the confusion.
In this step-by-step guide, you’ll learn exactly how to start a blog from scratch, even if you have no prior experience. We’ll cover what’s changed about blogging in 2026, the essential tools you actually need, and the foundational steps that set your blog up for long-term growth—so you can move forward with confidence and clarity.
What is a Blog?
If you’re new to blogging, it helps to understand what a blog really is. A blog is a website where you post written content on a regular basis. In 2026, blogs are not just online journals. They are places where people share ideas, teach others, and build trust with readers over time.
Many beginners think they need to be great writers, tech experts, or have a large audience before they start a blog. Not true. You don’t need special skills or experience to begin. If you can explain something you know, share a story, or help someone solve a problem, you already have enough to start.
Starting a blog “from scratch” does not mean doing everything at once. It means picking one main topic, setting up a simple website, and adding content as you go. You don’t need a perfect design or dozens of posts right away. What matters most is getting started and staying consistent.
Blogging is a good choice for beginners because it is flexible. You can blog as a hobby, to support a business, or to earn extra income over time. You can work at your own pace and grow your blog step by step.
If you’ve been waiting until you feel ready, now is a good time to start. Every blogger begins as a beginner. The best way to learn blogging is by starting and learning as you go.
Blogging for Beginners in 2026: What’s Changed
When I started blogging many years ago, it was more as a hobby. It was fun to write about things I was doing, like keeping a journal. But as my little blog grew, I learned that blogging has changed a lot over the years. However, the main idea is still the same: helpful content wins. In 2026, blogs are less about posting often and more about creating content that answers real questions and solves real problems. Readers expect clear, useful information, and search engines reward blogs that deliver it.
AI now plays a bigger role in blogging, especially for research, outlines, and editing support. However, AI does not replace original ideas or personal experience. Search engines are focused on search intent, which means they care more about how well your content matches what someone is actually looking for—not just which keywords you use. Good SEO today is about clarity, structure, and usefulness.
Long-form content still matters because it allows you to cover a topic fully in one place. Well-written, in-depth posts tend to rank better, build trust with readers, and keep people on your site longer. One strong, helpful post can outperform several short, rushed ones.
For beginners, the focus should be simple: choose one clear topic, write helpful posts, and learn the basics of SEO without overthinking it. You do not need to master every tool or trend. Start with quality content, consistency, and a willingness to improve as you go.
How to Start a Blog from Scratch Step by Step
Learning how to start a blog from scratch is easier when you break the process into simple steps. Don’t try to do everything at once. It will cause you to become overwhelmed, stressed, and burned out, which is why a lot of bloggers quit in the very beginning. This section walks you through each part in order, from choosing your topic to setting up your site.
Step 1 – Choose a Blog Niche
A blog niche is the main topic your blog focuses on. Instead of writing about everything, you choose one general area so readers and search engines know what your blog is about. A clear niche makes it easier to attract the right audience and decide what to write about.
Beginner-friendly niche examples include:
personal finance basics
simple home organization
beginner fitness
easy recipes
parenting tips
homesteading
faith-based encouragement
learning a new skill
The best niches are ones you’re interested in and can write about consistently, even as you continue learning.
A common mistake beginners make is choosing a niche that is too broad, like “lifestyle” or “everything I’m interested in.” Another mistake is picking a niche only because it seems profitable, without any real interest in the topic. Focus on clarity, not perfection. You can always narrow your niche as your blog grows.
Step 2 – Choose the Right Blogging Platform
A blogging platform is the tool you use to create and manage your blog. Some popular options for beginners include WordPress, Wix, Squarespace, and Blogger. Each has its pros and cons, but the right platform depends on your goals, budget, and technical comfort level.
WordPress is the most popular choice for beginners who want flexibility and long-term growth. It’s easy to use, works with many themes and plugins, and gives you control over your blog as it grows. You don’t need to be a developer to get started, and there are plenty of tutorials to guide you. (It’s what I use for all my blogs and have been using for years.)
You can start with a free platform, which is easy and low-risk, but free blogs often come with limitations, like restricted design options, ads, and less control over your domain. A self-hosted blog (like WordPress.org) costs a little more, but it gives you full control, a professional domain name, and more opportunities to grow and monetize your blog.
For beginners, starting with a self-hosted WordPress blog is usually the best long-term choice.
Your domain name is your blog’s address on the web, like http://www.yourblogname.com. It’s one of the first things readers notice, so choosing the right one matters. A good domain is easy to remember, easy to spell, and reflects your blog’s focus.
When picking a domain, think about branding versus keywords. A brandable name is unique, catchy, and helps you stand out, while a keyword-focused name tells people (and search engines) exactly what your blog is about. You can combine both, but avoid long, confusing names.
Common mistakes include:
using numbers
using hyphens
using complicated words that are hard to type
copying another blog’s name
choosing something too trendy that might feel outdated quickly
Keep it simple, clear, and easy to remember so readers can find your blog without any trouble.
Once you come up with a name, you need to make sure the name you want is available. These sites offer a free domain name search:
Web hosting is the service that stores your blog’s files and makes them available online. It’s where your blog “lives”. Think of it as renting space on the internet for your blog. Without hosting, your blog won’t be visible to readers.
For beginners, all you need is a reliable, beginner-friendly hosting plan. Most hosting providers include one-click WordPress installation, email support, and basic security features—everything you need to get started without technical headaches. You don’t need the most expensive plan at first; a basic shared hosting plan is enough for a new blog. In terms of cost, beginner hosting usually runs between $3–$10 per month, depending on the provider and plan. Many providers also offer discounts for the first year. Choosing good hosting early can save you headaches later, so pick a reputable company that makes setup and support simple. (Many bloggers prefer BlueHost.)
Once you know how to start a blog from scratch, the next step is learning how to create a blog that can grow over time. This means more than just setting up a website. It’s about building a blog that looks professional, is easy to navigate, and is set up to attract readers from the start. A blog ready to grow has the right structure, essential pages, and a simple design that lets your content shine. By focusing on these basics early, you’ll save time and make it easier to expand your blog in the future.
Install WordPress and Essential Settings
Once you’ve chosen your hosting, it’s time to install WordPress. (WordPress makes creating and managing your blog easy.) Most hosting providers have a one-click WordPress installation, so you don’t need any technical skills. After installing, your blog will have a basic structure you can start customizing right away.
Here’s a simple setup checklist for beginners:
Choose a blog title and tagline
Set your preferred time zone and language
Check your permalink settings so your URLs are simple and easy to read (this is important!) To do this: in your WordPress dashboard, hover over “Settings” then click “Permalinks.” Choose “post name.” This gives you a better chance of ranking higher in search engines, plus makes it easier for readers to find your posts.
Add your first user account (usually your own)
It’s also important to protect your blog with basic security measures. Start with a secure password, limit login attempts, and install a simple security plugin if your host allows it. Don’t forget backups! These save a copy of your blog in case something goes wrong. Most hosts offer automatic backups, or you can use a free plugin to make sure your work is safe.
When setting up your first blog, how it looks is important, but it doesn’t need to be complicated. One of the blogging basics for beginners is keeping your design simple and easy to navigate while still looking professional.
Start by picking a theme, which is a ready-made template that controls the layout, colors, and fonts of your blog. Themes make it easy to get started, and you can make small customizations without touching any code. Avoid adding too many colors, fonts, or widgets, because overdesign can make your blog confusing for readers and can slow down your entire site.
I use a paid theme for all my websites from BluChic, and I love it! It’s easy to install, and everything is laid out for you, so all you have to do is change the text and images.
Your blog also needs to be mobile responsive, meaning it adjusts automatically to phones and tablets. A responsive design ensures your blog looks good and works well on any device.
By focusing on a clean, simple layout with just a few thoughtful customizations, you’ll create a blog that’s easy to read, professional, and ready to grow—an essential step in learning how to start a blog from scratch.
Create Essential Blog Pages
It’s important to add a few essential pages that help your readers understand your blog and trust your content. These pages make your blog feel complete and professional, even for beginners.
About Page: This is where you tell readers who you are and what your blog is about. Share a little about yourself, your goals, and why you’re writing. A clear About page helps visitors connect with you and your content.
Contact Page: Make it easy for readers, potential collaborators, or brands to get in touch. Include a simple contact form or your email address. A Contact page shows that you’re approachable and serious about your blog.
Privacy Policy / Disclaimer (Disclosure): These pages protect you and your readers. A Privacy Policy explains how you handle visitor information, while a Disclaimer or Disclosure covers things like advice or affiliate links. Even simple templates are enough for a new blog.
Adding these pages early gives your blog a strong foundation and shows readers that your site is trustworthy, organized, and ready to grow.
Beginner Blogging Guide: Writing Your First Posts
Now it’s time to talk about writing because a beginner blogging guide isn’t complete without tips on writing your first posts. Starting out can feel terrifying, but it’s easier than you think if you focus on simple, helpful content. And when you’re learning how to start a blog from scratch, you need to know every detail possible for long-term growth.
What to write first Start with posts that introduce your topic and share your knowledge or experience. You could write a “Welcome” post explaining your blog’s purpose, a post answering common questions in your niche, or a simple how-to guide. Your first posts don’t have to be perfect. They’re just a starting point.
How many posts to start You don’t need a huge library before going live. Aim for 3–5 quality posts so visitors have something to read when they arrive. This gives your blog enough content to feel useful while letting you add more posts consistently over time.
Basic SEO for beginners Use keywords naturally in your titles, headings, and a few times in the text. Add meta descriptions for each post and use descriptive image alt text. Don’t overthink it! Focus on helping your readers find value in your content.
Formatting for readability Break your text into short paragraphs, use headings and subheadings, and include bullet points or numbered lists when possible. A clean, easy-to-read layout keeps people on your blog longer and makes your content easier to understand.
Once your first posts are live, it’s time to focus on what comes next. These blogging basics for beginners will help you build momentum and grow your blog without feeling overwhelmed.
How Often to Publish Consistency matters more than quantity. Start with one or two posts per week or every other week—whatever you can manage without burning out. The key is to stick to a schedule so readers know when to expect new content.
Promoting your Blog (without overwhelm): Share your posts on social media, join niche communities, or connect with other bloggers. You don’t need to be on every platform. Just pick one or two that fit your audience and focus on them. Simple, steady promotion works better than trying to do everything at once.
Starting an Email List Early Even if your blog is new, begin collecting emails from day one. An email list helps you stay in touch with readers, share updates, and grow your audience. Offer a small freebie, like a checklist or guide, to encourage sign-ups.
I use Kit to send newsletters and emails to my subscribers. They have easy-to-use templates, which make emailing updates to your subscribers really fast and simple.
Tracking Basic Metrics Keep an eye on simple stats like page views, popular posts, and traffic sources. Free tools like Google Analytics or your hosting dashboard can help. Tracking metrics shows what works, so you can create more of the content your readers love.
Can You Make Money Blogging in 2026?
Can you actually make money from blogging? If you’re learning how to start a blog from scratch, it’s important to have realistic expectations. Blogging can make money, but it usually takes time, consistent effort, and a focus on providing value before income comes. Most new bloggers don’t see large profits right away, but even a small, steady income is possible as your audience grows.
Beginner Monetization Options Once your blog has a few posts and a growing audience, there are simple ways to start earning, including:
affiliate marketing (recommending products you use)
offering a small digital product like a guide or template
displaying ads through beginner-friendly networks
You don’t need a huge following to start testing these options.
What to Focus on Before Monetizing Before thinking about money, focus on building your blog’s foundation. This means creating helpful content, growing an email list, and learning basic SEO. A blog with engaged readers and a clear niche will naturally perform better when you introduce monetization.
Common Beginner Blogging Mistakes to Avoid
Starting a blog can be exciting, but beginners often make mistakes that slow their progress. Knowing what to watch out for can save you time and frustration. Avoiding these common mistakes helps you stay on track and build a blog that grows steadily over time.
Trying to do everything at once. Many new bloggers want to perfect their design, write dozens of posts, and master SEO all at the same time. Focus on one step at a time—set up your blog, publish a few posts, then improve as you go.
Ignoring SEO. Even a helpful blog won’t reach readers if no one can find it. Basic SEO, like using keywords naturally, writing clear headings, and adding meta descriptions, helps your content get discovered without being overwhelming.
Inconsistent publishing. Skipping weeks or months between posts makes it harder to build an audience. Pick a schedule you can stick to, even if it’s just one post per week, and stay consistent.
Giving up too soon. Blogging takes time. Many beginners quit before they see results. Growth comes from regular posting, learning from mistakes, and gradually improving your blog.
Frequently Asked Questions About Starting a Blog
Is blogging still worth it in 2026? Yes! Blogging is still a powerful way to share your ideas, build an audience, and even earn extra income. While social media is popular, blogs give you control over your content, help you establish authority, and allow your content to be discovered through search engines over time.
Can you start a blog for free? Yes, you can start a free blog on platforms like WordPress.com or Blogger. Free blogs are a good way to practice and learn, but they come with limitations, such as fewer design options, ads, and less control over your domain. For long-term growth, a self-hosted blog is usually a better choice.
How long does it take to make money? Making money from a blog usually takes time and consistent effort. Most beginners don’t earn much in the first few months. Depending on your niche, content, and promotion, it can take 6–12 months to start earning a steady income. Focus first on building helpful content and growing your audience.
How much does it cost to start a blog? You can start a blog for as little as $3–$10 per month for hosting, plus a domain name that typically costs around $10–$15 per year. Additional costs might include a premium theme or tools, but you can start with free resources and upgrade later as your blog grows.
Final Thoughts: How to Start a Blog From Scratch (Without Overwhelm)
Starting a blog can feel overwhelming and intimidating, but the most important step is simply to begin. Remember, you don’t need to have everything perfect from day one. Focus on progress, not perfection, and take things one step at a time. Learning how to start a blog from scratch isn’t as hard as you might think.
Pick a niche, set up your blog, write a few helpful posts, and learn as you go. Each post you publish, each page you create, and each small improvement you make brings you closer to a blog that grows and succeeds.
Blogging is a journey, and beginners can start small while building skills and confidence along the way. By following this beginner blogging guide and focusing on simple, practical steps, you can start your blog without overwhelm and create a site that’s ready to grow over time.
Now it’s your turn: take the first step, start writing, and watch your blog come to life.
Starting a blog can be overwhelming. During the first year of your blogging journey, you shouldn’t let yourself get overwhelmed with all the information out there. This post contains the only things you need to focus on during your first year of blogging. Keep reading to see what they are!
You’re probably here because you just started a new blog and now you have no idea what to do.
And that’s ok! I had no idea what to do after I started my first blog, either.
It took a lot of research over a lot of years to figure it all out.
I got frustrated and I almost gave up and deleted my entire blog.
And I’m not the only one. Did you know that 95% of people who start a blog fail in their first year blogging and give up?
That’s a lot of new bloggers becoming overwhelmed with how much work actually goes into blogging!
Yes, having a successful money-making blog is a lot of work and does take time and patience. But I don’t want you to get frustrated and give up as a new blogger! That’s why I put this list together of the most important things you need to focus on during your first year of blogging.
The Most Important Things to Focus on During Your First Year of Blogging
*Post contains affiliate links. They are free for you to click on, however, I will be compensated if you make a purchase. This supports my family and I thank you for your support! To learn more, click here.
1. Have a plan for your blog.
Having a plan for your blog from the very beginning will save you a lot of time and frustration. If you start writing without any planning in place, your blog will fail. And you will have wasted a whole lot of time. I made this mistake in my first year blogging and I gave up blogging for a while. This is my best tip for new bloggers!
It’s super important to sit down and come up with a plan and some goals so your blog will become a success.
How to define your blogging goals:
Brain dump: Grab a notebook and write down all of your blogging thoughts, plans, goals, fears, and concerns. Get everything out. Trust me – it works and it makes you feel better! Keep in mind this is just a brain dump for overall blogging goals, not ideas for posts right now.
Organize your thoughts: Draw a line down the center of a piece of paper. On the left side of the paper write “annual blogging goals” and on the right side write “ultimate blogging goals”. Go through your brain dump list and start sorting ideas into these two categories.
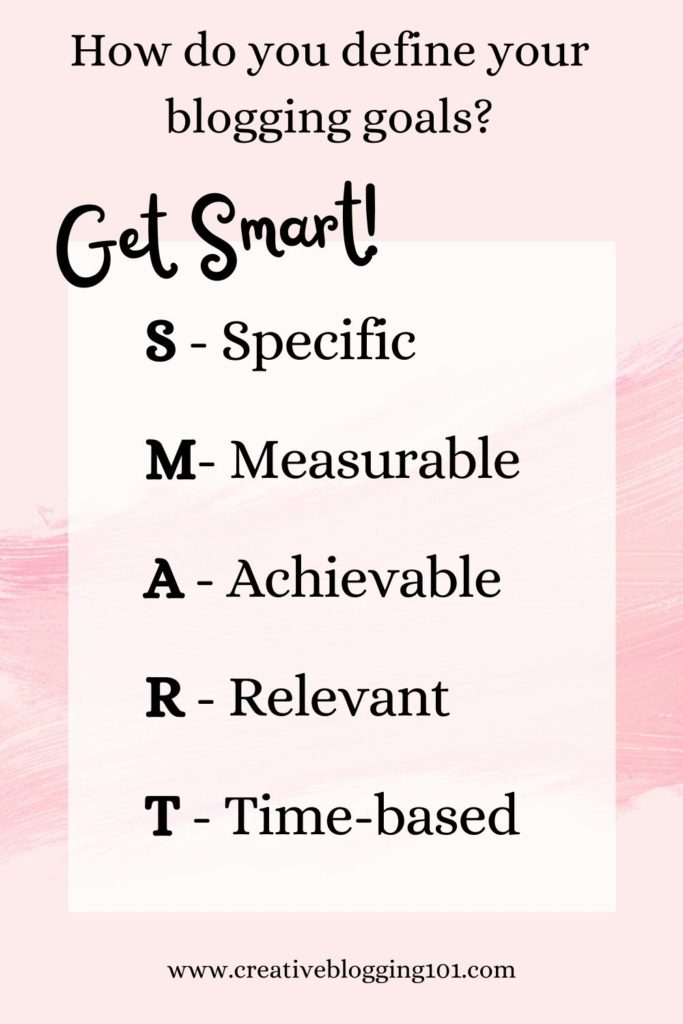
Get S.M.A.R.T.: Now it’s time to set realistic and reachable goals, which you’ll find examples of all throughout this post. Examples of some goals are setting up an email address, getting 500 subscribers to your email list in the first 6 months, and so on. SMART stands for
Specific
Measurable
Achievable
Relevant
Time-based
2. Set up your blog the right way.
I know what you’re thinking, “What? I’ve already set up my blog!”
There’s more to a blog than having a domain name and host and installing WordPress.
Here are a few things you should focus on during your first year of blogging to get your blog set up correctly:
Choose a theme:The theme is the template for the look and layout of your site. It’s where all of your brand colors and fonts come together in a user-friendly way.
Choosing a blog theme is important, but it’s not something you should spend a lot of time on in the beginning. You’ll always be improving the overall look of your site.
WordPress has free themes you can use or you can choose to go with a premium theme, which is not free. These are updated a little more frequently and have less of a chance of breaking down on you. But a free theme is the way to go when you’re first starting out with your blog.
Tips for choosing a theme:
It should be lightweight, not overloaded with plugins and data that is just going to slow it down.
It needs to be mobile-friendly.
It should be easy to customize.
Set up categories: Categories are how you sort and group your blog posts into different sections.
To set up categories, go to your WordPress dashboard, then under “posts” click “categories” then “add new”. Name your category, set a slug, choose a parent category (only if this is a subcategory), set a basic description, then click “save”. (Learn the differences between categories and tags here.)
Set up your main pages: Click here for information on all the pages you need to have on your blog and why they’re important. Setting up these pages is very important to focus on during your first year of blogging and I would recommend setting them up right away. These blog pages include:
Create your menu: The menu sits at the top of your blog and is the best way to help readers navigate through your blog. You can add pages, posts, and outside links to your blog menu.
To create your menu, go to your WordPress dashboard and click on “appearance” then “menu”. Give your menu a new name (something like top menu or whatever), then save it.
Next, choose the pages your want to add from the left column and drag and drop them however you want them to show up on your blog.
3. Set up Google Analytics.
Google Analytics is a free tool provided by Google to help you track the traffic that comes to your blog.
With Google Analytics, you can learn all about audience behavior on your site, such as their:
interests
demographics
the pages they visit the most
and more!
Studying audience behavior through Google Analytics gives us bloggers the power to grow our blogs as well as serve our readers the best we can.
You can learn everything you need to know about Google Analytics in this super helpful guide written Moz.
4. Create an email list.
Having an email list is the best way for your readers to get your posts. More than likely they are not going to remember to visit your blog every day to see if you’ve written a new post. To get them to see and read what you’ve written, you need to send them an email sharing that information. You should never depend solely on social media to share your blog.
Creating an email list is one of the most important things to focus on during your first year of blogging. Aim to get at least 500 subscribers in your first blogging year.
Why is having an email list so important for your blog?
Email subscribers are more likely to share your content than they would if they saw your post on Instagram.
Also, people signed up to get your emails for a reason – they’re interested in what you have to offer. Having an email list makes it easier to target the right people for offers and products.
Best free email marketing tool:
Most bloggers use ConvertKit for their email marketing. They are very user-friendly, their sign-up forms are customizable, and it’s FREE to sign up!
How to build your email list in your first year of blogging:
Step 1: Offer an incentive
Incentives are often referred to as “lead magnets“. When visitors come to your site and see that they are going to get something free just for joining your email list, they are going to sign up. Everyone loves free stuff!
They need to be useful, solution-focused, and goal-driven. If your incentive is not useful and doesn’t solve the reader’s problem, they are not going to bother signing up for it. Also, ask yourself where does the free incentive sit in your sales funnel? If you have a product to offer for sale, be sure the opt-in form leads subscribers to your product landing page after they sign up.
Types of incentives to offer include:
checklists
eCourses
eBooks
video tutorials
workbooks
planners
calendars
Step 2: Add opt-in forms to your blog
Create eye-catching and conversion-focused opt-in forms with bold colors and fonts to attract attention. Be sure to place forms in strategic places throughout your blog, such as within every blog post and in the sidebar widget.
Pop-up forms that catch people when they are about to leave your site are perfect attention-grabbers. Make sure they know what they are going to miss if they leave your site without signing up for your email list.
5. Create valuable content.
One of the main things to focus on during your first year of blogging is creating valuable content that attracts readers. Find topics that people are interested in and want to know more about. Search a topic on Google and look at the questions that pop up in the “People also ask…” box. Use those questions as questions you can answer in blog posts for readers.
As a new blogger, you should get into the habit of writing every day. That doesn’t mean you should post a new blog post every day! But you should be focused on writing something, even if it’s just to rewrite and make an older post better. Aim for at least 2 blog posts a week and remember to remain consistent with your posts.
Not every blog post needs to be SEO-focused and filled with a lot of keywords. During your first year of blogging, you should focus more on having content written and shared. Focusing on SEO and keywords will come later.
Best types of content to write
The best types of posts to write are called “pillar posts“. Pillar posts are meaty, useful, well-written posts that are engaging. They are usually filled with relevant images and helpful videos to help readers understand what’s going on. Topics in pillar posts are covered in-depth so much that people will link to them for years to come.
Examples of pillar posts include:
“how-to” posts
lists
roundups
ultimate guides
definition articles (explain certain topics such as content marketing very in-depth)
Comments count toward long-form content, too. Ask a question at the end of your post to get readers engaged.
I would highly recommend that you start monetizing your blog during your first year of blogging. Don’t make the mistake of waiting until after you have published a ton of posts like I did. I spent months going back through posts and adding in affiliate links. This is so much easier if you start monetizing your blog from the beginning.
What are the best ways to monetize your blog during your first year of blogging?
Affiliate Marketing: Affiliate marketing is promoting someone else’s products. For example, sharing links to Amazon products within your blog posts. If someone clicks one of your links and makes a purchase you will receive a small commission.
Start off by promoting 1-2 affiliates directly related to your niche. To promote these affiliates you can write affiliate-related articles or place affiliate links within related blog posts. Also, you can place affiliate banners on sidebar widgets with eye-catching graphics. Be sure to promote affiliate links to your email list and on social media as well.
Create a product to sell: Digital products are very popular right now. People are buying eBooks and printable planners now more than ever.
Types of products to create and sell include:
Digital products such as calendars, planners, eBooks, eCourses, copyright-free images
Services such as one-on-one consulting, coaching, photography, vacation planning
Before creating a product to sell to your audience, ask yourself these questions:
What does your target audience really need/want?
What questions do they have?
How can you solve the problems they are facing?
Sponsored posts: Sponsored posts are articles that a company or brand pays you to write. You must include links to their products and services within your post. Reach out to brands and companies you love and trust. It’s best that you actually use their products so that you can share your honest review with your audience to build a trusting relationship with them.
7. Drive traffic to your blog
The main ingredient to a successful money-making blog is traffic. The more visitors you have, the more people you have to click on affiliate links and ads and buy your product(s). It can take up to 6 months for Google’s algorithms to fully index your site and for your blog to start ranking in top search results.
During your first year of blogging, you should be focused on driving traffic to your blog through Pinterest and social media. Also, make sure to read and comment on other blogs. You may get lucky and gain new followers.
Backlinks are another great way to drive traffic to your blog. Getting links to your blog from other sites with a higher domain authority will help you rank higher and quicker on Google. (Domain authority is a search engine ranking score developed by Moz that predicts how likely a site is going to rank in search engine results pages. The scores range from 1-100).
When you first start blogging, you might write about different topics to see what interests your audience the most. After writing several blog posts and studying Google Analytics, you start niching down and choosing your target audience.
Niching down to a specific topic helps you rank in Google quicker and higher because Google can understand what your blog is about. Readers will also know exactly what your blog is about. And the ones who are most interested in the topic you’re writing about will sign up for your emails and keep coming back to read more.
Also, when your blog is niched down, it tends to get more traffic from Pinterest.
To niche down your blog, choose a topic that combines your passion and interests with your experience. Think about who can benefit from your skills. This will help you gain authority and build trust with your targeted audience.
Having a successful blog shouldn’t be an overwhelming chore. There are a lot of sites out there jampacked with information on how to make money with your blog. If you try to do too much at once, you will get burnt out and overwhelmed and you will give up and quit. Therefore, your blog will fail and you will have lost valuable time and money.
The above tasks are the most important tasks that you need to focus on during your first year of blogging if you are serious about having a successful money-making blog for years to come. In the following years you should be putting more focus on learning SEO, Google algorithms, long-tail keywords, and more to keep your blog going.
If you’re a new blogger, what are your goals to focus on during your first year of blogging? If you’re an established blogger, what did you focus on most during your first year? Is there anything you wish you would’ve focused on sooner?
You’ve written and published your amazing blog post. Now what? If you’re scratching your head trying to figure out what to do next, keep reading! I’m sharing 6 steps to take after publishing a blog post that will bring traffic to your blog and get you noticed!
If you’re reading this, then you have more than likely already created your blog and you’ve written a few blog posts.
I’m sure you want others to read your posts and follow your blog. After all, you put a lot of hard work into it. But how do you get people to know that you’ve written a new blog post?
Keep reading for 6 steps to take after publishing a blog post.
6 Steps to Take After Publishing a Blog Post
Following these steps after publishing your blog posts is very important, especially if your blog is a money-making blog. Even if your blog is just a hobby blog, you can still follow these steps to get a larger audience.
1. Promote
Promoting your blog post is simply sharing it on your favorite social media site. Share every post to whichever social media you use the most. I would not recommend trying to use all of them. It just gets overwhelming and it will feel more like a chore that you hate.
Choose one social media site to start with, such as Instagram or Pinterest. (Pinterest is my favorite because it brings the most traffic to my site.)
Also, it’s okay to share one post more than once. If you only write one post a week, break the post up into several sections to share on social media.
For example, let’s say you are publishing a blog post about organizing a kitchen pantry.
Monday, share why keeping an organized pantry is so important on Instagram with photos of your messy pantry before and your organized pantry after.
Wednesday, share the steps you took to get your pantry organized with photos. This is also a great opportunity to share the organizers and/or containers you used using affiliate links.
Friday, challenge your followers to get their pantry organized, too.
Promoting your posts is one of the easiest ways to get your posts noticed and bring in more traffic to your blog. After all, if you’re not sharing your posts with your social media followers, they’re not going to know you posted anything. Unless they’re on your email list, of course. (More on that later.)
Make sure you have Google Analytics installed and connected to your blog and that you’re taking advantage of it. It’s a free service that’s easy to use and it provides you with a ton of valuable information about your site.
With Google Analytics you can:
See how people find your site (organic search, social media, other sites, etc.)
Track what people do while they’re on your site (You can see how long they stay on your site, what pages they click through to next, etc.)
Gain data on visitors (You can learn their demographics, geography, and general interest – all of which help you learn your target audience.)
Figure out the most popular pages on your site (so you can write more of these types of posts)
After publishing a blog post, you need to be checking your stats for all of this information. Checking your stats can help you learn how to improve your blog and your posts in the future.
3. Link to older posts
Every time you publish a new blog post, you should include a link to that post in older posts that are similar.
For example, back to your pantry organizing post. Let’s say you have published a post in the past with a tutorial on how to organize your kitchen cabinets. After publishing a blog post on how to organize your pantry, go back to the kitchen cabinets post and add a link to the pantry post.
This is called “internal linking” and is great for SEO. It also decreases bounce rate, which refers to the percentage of visitors that leave your website after only viewing one page on your site. You want visitors to stay on your site for a while and visit other pages. Linking to other posts within posts will make it easier for visitors to find other relevant posts. Plus, it will keep them on your site longer.
4. Create 3-5 pins for Pinterest
Pinterest is the best way to get your blog posts seen by thousands of people.
I use Canva to create pins for my posts. It’s easy to do and I already have my pin templates set up for my brand. Canva is free to use and they also have a paid version that allows you to access all of their templates and photos.
After creating pins for Pinterest, you can schedule them to pin at certain times on the days you choose with Tailwind. This is so easy to do and saves you a lot of time. Tailwind isn’t free, but it is cheap and I would definitely recommend using them to schedule pins.
Having an email list for your blog is a must. I know you’ve heard it all before, but trust me – it’s true. For my other blog, I send out a weekly email with a personal message and links to my latest blog posts. I make sure not to overwhelm my readers and fill up their inbox daily.
After publishing a blog post, make sure you’re sending it out to your email list so your readers will know about it. Your loyal followers will be excited to see what you’re up to and they’ll be eager to read what you’ve written.
If you haven’t already signed up for email, I would recommend ConvertKit. It’s easy to learn and they have the best customer service! If you ever need help, they respond quickly with answers. Plus, their opt-in forms are so pretty!
Publishing a blog post that asks a question will more than likely get you a lot of comments. Make sure you are responding to all the comments as quickly as possible. This is great for SEO as well as for your readers. Nobody likes to be ignored.
Responding to comments is a great way to gain relationships with your readers. They’ll see you as a real person that they can relate to. And they’ll appreciate you taking the time out of your busy day to respond to them.
To recap:
6 Steps to Take After Publishing a Blog Post
Promote
Track your stats with Google Analytics
Add a link to the new post within relevant older posts
There are many awesome ways you can make money with your blog. But one of the easiest ways is by earning passive income. Keep reading to learn what passive income is and how easy it is to make money with it in this extensive guide!
Any income that you can make from your blog is great. And there are a lot of ways you can make money blogging.
But one of the easiest ways to make money blogging is by earning passive income.
You may have heard other bloggers talk about how they recently started a blog and now their blogs are rolling in money while they sleep.
And you’re left wondering how in the world they’re doing that while you’re working your butt off and still trying to make ends meet!
The good news is – you can do it, too!
Once your blog starts bringing in a steady stream of traffic, you can start earning from passive income.
What does this mean for you?
It means you can go on vacation and still make money from your blog!
You can go to sleep at night and wake up to money in your bank account!
How do you do that? Keep reading for 6 totally genuine ways you can start earning passive income from your blog.
*Disclosure: This post contains affiliate links, meaning I earn a commission if you click through and decide to make a purchase. Thank you for supporting my blog!
What is passive income?
Passive income, when relating to bloggers, is income that is earned from your blog on autopilot.
It’s the result of you doing the work once and continuing to make money from that work in the future with minimal upkeep.
Some people believe that passive income is getting paid for doing nothing. That’s not the case at all. You still have to put in the work and effort.
Just as an example, let’s say you create an eBook. You do all the work involved in writing your eBook – drafting the outline, writing the chapters, editing, etc.
Finally, your eBook is complete! Now you have to set up a marketing strategy so customers can find you. The marketing strategy you put in place will allow customers to purchase from you continuously without you having to do a ton of active work.
Money is now regularly coming in after the original process of creation, promotion, and automation.
This is called “passive” income because you are not “actively” earning the money.
And yes, you can continue earning passive income while you sleep!
Why is passive income so important?
Passive income allows you to have freedom. It’s not connected to your time, so you have the freedom to do other things with your time, such as write more blog posts or travel.
Another reason it’s so important is for financial security.
In our family, my husband works outside of the home and I’m the stay-at-home parent homeschooling our daughter. Having a passive income is important for us because if he were to lose his job, we’d still have money coming in.
The more you can bring in passive income, the better off you’ll be in the future.
Think of all the freedom you’ll have not being a slave to money!
You can pay off student loans or medical bills or even set up an emergency fund or a kids’ college fund.
Steps to Monetizing Your Blog for Passive Income
Below are some steps to follow if you are thinking about setting up your blog for passive income.
1. Choose the right niche
Before you even get started with a blog, you need to make sure you know exactly what niche, or topic, you want to write about. Your niche is what your blog posts will be focused on as well as the target audience you’re trying to reach.
To read more about how to find your blog’s niche, click here.
2. Create quality content
Quality content is so important because it gets your blog ranked on search engines like Google. The higher you rank on Google, the more traffic you’ll get.
Plus, people are visiting websites because they have questions that need answering. You want your content to answer those questions so those visitors will become readers and sign up for your email list to get more.
To learn how to write quality content to keep readers wanting more, click here.
3. Create evergreen content
Evergreen content is content that is not time sensitive and continues to drive traffic even after it has been published. It stays “fresh” over long periods of time. It never goes out of date.
News articles and posts about the latest fashion trends are not evergreen content because they are constantly changing.
Common evergreen formats include:
Lists
“How-to Tutorials
Videos
Top Tips
Product Reviews
6 Ways to Start Earning Passive Income as a Blogger
1. Selling your own digital products
One way to earn passive income and monetize your blog is by selling your own digital products. Examples of digital products are:
eBooks
eCourses
digital art
informational guides and printables
stock photos
eBooks and eCourses are very popular. After you put in all the effort of creating your eBook or eCourse, and then market it, the hard part is over. When people learn about your product and purchase from you, the earned income flows right into your account passively.
I create most of my digital products in Canva. With Canva, there’s a free version and a paid version. If you’re planning to create digital products to sell, I’d highly recommend the paid version.
With Canva Pro, you have access to 2 million free stock photos. Also, you’re allowed to use your own fonts and brand colors, and share templates to sell with your audience. It’s a pretty amazing way to grow your digital product business!
Keep in mind that the digital products you create and sell should be relevant to your specific audience. It needs to solve their problems and help them.
Think about who your audience is and exactly what they need from you. What problem do they have that you can easily solve?
2. Affiliate Marketing
With affiliate marketing, you are promoting products and services for other businesses on your own blog. Whenever someone clicks the link and makes a purchase, you get paid a commission.
Affiliate marketing is considered passive income because you write the blog post with links once (initial work) and when someone buys the product you’re recommending, you earn money from it. And you continue to earn money from those affiliate links as long as your blog post is up to date and still available.
The best way to earn money through affiliate marketing is to join affiliate programs that would be beneficial to your audience, then share their products on your blog.
One of my favorite affiliate programs to earn passive income with is Ultimate Bundles. To learn more about their program and how to be successful with it, click here.
Keep in mind:
While affiliate marketing is a nice (and easy) way to monetize your blog, it does take some time to earn enough income to make a comfortable living. It’s not a get-rich-quick kind of thing.
Most affiliate companies have a holding time on your sales. This means that even if earn money today, you probably won’t see the deposit for up to 60 days after the sale.
3. Sponsored Posts
This is one of the most popular ways to earn passive income as a new blogger. Companies will pay you to write a post promoting their service or company.
Be sure that if a company reaches out to you for collaboration, that it’s a good fit for your blog and for your audience.
Also, only go with companies that you love and trust and fit well with your niche.
4. Ad Placement
It’s pretty easy for bloggers to place ads on their site and earn extra income from them. Even new bloggers just starting out with their blogs can do this.
However, too many ads on a website are extremely annoying. They’ll slow down your site and cause visitors to leave.
One ad network that is easy to use and doesn’t overdo ad placement is Media.net. Their requirements are easy to reach and they accept new bloggers. Click here to get Media.net for your site
Another source of passive income is to create a niche membership site. This is a site that has a section that is accessible entirely to members only. A site member pays a monthly (or yearly) fee in order to access the content.
Keep in mind that members will be expecting the content to be up to date, which will require ongoing work on your part. Membership sites require ongoing updates to keep paid subscribers interested and subscribed.
6. YouTube
Videos have become increasingly popular over the years. They provide your site more authority and they can provide passive income through ad placement.
YouTube does require a certain number of subscribers as well as a certain number of hours of watch time in order for you to have a monetized channel. There’s also a review process.
However, once the requirements are met, you can start to make considerable income!
4 Important Truths About Earning Passive Income as a Blogger
1. It takes a lot of effort
It takes effort to grow any new business and it’s the same with blogging.
Effort to build a community and gain their trust.
Effort to create and sell a product.
Effort to make a steady income.
You cannot get overwhelmed and frustrated and just give up if your blog isn’t growing and making money. You just have to put more effort into it and keep going.
2. It takes strategy
Becoming successful with passive income streams does not just happen immediately. You have to have a realistic plan in place. Every successful business has a realistic strategic plan in place for profit and growth.
3. It takes a bit of time
No successful business is built overnight. It will take time to get your blog off the ground and bringing in income. But that time will be worth it! Your main focus, in the beginning, is to narrow down your target market and create valuable content for your readers.
It can take a few weeks or even months to create the content required to generate enough traffic. Plus, it takes time for search engines to index your site and start showing it in search results.
4. It’s not expensive to get started
Many people have made thousands with their successful blogs and they didn’t have to go into debt to get there. Setting up a blog is not expensive at all.
You can start a blog for fairly cheap by purchasing a domain through Namecheap ($10/year) and by hosting with BlueHost ($3.95/mo).
Helpful Tips
Be diverse. Select a few different passive income streams so that you can continue growing your business. Don’t just rely on one source to support you and your business growth. Mix it up! Make sure you have income flowing in from a few different places each month.
Create a freebie. Entice visitors with a freebie in exchange for their email addresses. Send them weekly newsletters full of information and include your passive income links.
Be patient! It takes time for income to start consistently rolling in. It’s not going to happen overnight.
Don’t sound too salesy. Sharing about a product you use and love builds trust with readers and they’re more than likely to purchase from you if you’re sharing instead of selling. So add links without sounding too salesy.
Branch out. Don’t just share passive income links on your blog, share them across all the social media sites you’re on as well.
Know your niche. Make sure you narrow down your focus and know exactly who you’re writing for.
Network. The more you get yourself out amongst other bloggers in your niche, the more well-known your name and brand will become. If another blogger has a question from one of their readers that they can’t answer, they may think of you!
Key Takeaways
Earning passive income with a blog can help you earn a living working from home. It can also bring clarity to your blogging path. Once you know exactly who your targeted audience is and what they need, you can choose your passive income streams and start working on your strategy.
Keep in mind that it’s important to select a few different passive income streams so that you can continue growing your business. Don’t just rely on one source to support you and your business growth. Mix it up! Make sure you have income flowing in from a few different places each month.
To recap:
3 steps to monetizing your blog with passive income:
Choose the right niche
Create quality content
Create evergreen content
6 ways to start earning passive income as a blogger:
Selling your own digital products
Affiliate marketing
Sponsored posts
Ads
Memberships
YouTube
Of these ways to earn passive income as a blogger, which appeals most to you? Will you be giving these ideas a try?
Are you ready to start monetizing your blog? The Ultimate Bundles affiliate program is a great way to start making money quickly! Learn all about Ultimate Bundles in this post.
Trying to find the perfect affiliate program that fits your niche and makes you money is like trying to find a needle in a haystack.
We all know that affiliate marketing is a great way to make money with your blog. However, each affiliate program pays differently and often not a lot.
Most affiliate programs don’t pay you right away. Their pay periods can vary between 60 and 90 days. They need time to process your sales and give refunds need be.
*Post contains affiliate links. They are free for you to click on, however, I will be compensated if you make a purchase. This supports my family and I thank you for your support! To learn more, click here.
What are Ultimate Bundles?
Ultimate Bundles is a bunch of e-products bundled together in certain themes. It was created by a team of bloggers who work together to discover topics that people want to learn more about. They collect digital products from a variety of contributors and put theme together as a themed bundle.
These bundles often include:
eBooks
eCourses
templates
guides
checklists
cheat sheets
After all the information is gathered, the Ultimate Bundles team bundles all the information together and offers the products for sale at a huge discount. However, the prices are only offered for a few days to a week!
For example, the next upcoming bundle is The Ultimate Christian Living Bundle. It includes 50 products worth over $1,000. The price to purchase the bundle is only $29.99!
Here’s an example of a banner for the Christian Living Bundle:
Some themes offered by the Ultimate Bundles program include:
Healthy Meal Planning
Homemaking/Lifestyle
Healthy Living
Productivity
Blogging
As you can see, there are many topics that fit into different niches. There are other bundles that are brought out during the year, as well. Such as gardening and work from home bundle.
Different themes mean you will be able to reach more people. Some of your readers may not be interested in blogging, but they may really be interested in how to meal plan. Therefore, they’ll purchase the Healthy Meal Planning bundle, but not the Blogging bundle.
2 easy ways to make money with the Ultimate Bundles affiliate program
1. Make Money as an Affiliate
With each bundle sold, you get a 40% commission, which is much higher than many other affiliate programs. Selling a lot of bundles equals a lot of money for you!
Affiliates are able to purchase the bundle at 40% off the purchase price. That’s a great deal! If you sell 5 copies of a bundle, then you get the bundle for free! And if you’ve already purchased the bundle, you can request a full refund.
The Ultimate Bundles affiliate program offers excellent training and marketing materials to help you be as successful as possible. When you sign up to become an affiliate, you’ll also get access to their Facebook group where they provide tons of information. They provide their affiliates with everything they need through their affiliate’s portal.
Here you will find:
A promotion planner
Your affiliate link
Complete information about the bundle
Assets, links, and banners for your blog or social media
Links to their blog and podcast
Overall strategy video
Ways to maximize your sales
And so much more!
How to sign up to be for the ultimate bundles affiliate program
If you have a digital product, such as an eBook or eCourse that relates to a certain bundle, you can offer it to be sold as part of that bundle. Contributors earn 70% affiliate commission.
You can include links to your blog posts within your product, which will help drive traffic to your blog. Also, you can encourage people to sign up for your emails right from your offered product.
Another benefit to contributing your own digital products to a bundle is that your own readers and followers will be more encouraged to purchase the bundle. And you’ll end up earning a lot more on each sale.
How to sign up to be a contributor
To sign up as a contributor, you will need to fill out an application form. You’ll need to include information about your social media handles, the product you have to offer, and what type of bundle it will be a good fit for. They’ll also need to know the best way to reach you.
How to be successful with the Ultimate Bundles affiliate program
Best ways to promote Ultimate Bundles to make money
Email
The best way to promote Ultimate Bundles is through email. Your email subscribers are more likely to purchase your promotions, which equals a big boost in sales!
Ultimate Bundles will send you an email copy that you can send to your subscribers. Just make sure to edit the copy and make it your own.
(If you aren’t already using email for your blog, you need to start! It’s the best way to make money with your blog!)
Another way to promote Ultimate Bundles is with a blog post dedicated to a bundle.
For example, if you are a food blogger, purchase a food-related bundle, such as the Meal Planning bundle. Open it up and look at everything the bundle has to offer. Try certain parts of the bundle out so you’ll know exactly what to expect and what to share with your readers.
When you write your blog post, you should share the bundle instead of selling the bundle. Your readers are much more likely to purchase something you’ve tried and recommend than something you’re just trying to sell them.
Write your honest opinion about the bundle, even if there’s something you don’t like about it. Use your own voice and be 100% authentic and real.
Don’t have a blog? Click here to learn how to get started!
Social Media
With the Ultimate Bundles affiliate program, you can even share about the bundles on all of your social media sites.
The affiliate portal has a training webinar about using social media as well as a video on using Facebook for affiliate marketing. The videos can be found under the marketing training section.
They also offer plenty of banners and links you can use and share right on your social media sites.
Just like with the blog post, make sure you are sharing the bundles and not selling. You’ll get more purchases that way!
When do you get paid?
Ultimate Bundles pays on the 11th of the second month after the sale. For example, if you sell bundles in January, you’ll be paid on March 11th.
This may seem like a while, but think of all the money you’ll earn selling bundles! It’s best to try to sell as many bundles as you can each month they are available to make the most of the program.
Useful tips to help you be successful with the Ultimate Bundles affiliate program
It’s best to purchase a bundle so you can see how it works. Once you learn more about the bundle, you can write a blog post on exactly what’s included and how you used the bundle. Which is a great way to make more sales. It’s better to share a product than to sell a product.
Check the Ultimate Bundles affiliate program calendar to see upcoming bundles. Since each bundle is only available once a year, you can start promoting them in advance. This is a great way to get your readers excited about the bundles.
Take full advantage of the training they offer. This will not only help you be successful selling bundles but will help with all affiliate marketing. Watch the training webinars, use their tools, sign up for the Facebook group.
Don’t forget to let your readers know that your link is an affiliate link!
Add your own personal touch when writing about the bundles, whether it’s through email, social media, or a blog post. This builds trust with your readers and they’re more likely to purchase from someone they trust.
Use the available graphics to attract more attention when marketing the bundles.
When writing about the bundles, be as specific as possible about the problems the bundle is going to help your readers with. You want your readers to feel like they need to purchase the bundle in order to solve all their problems.
Make sure you let your readers know that the bundles are only on sale for a short time and are only available once a year. Create a sense of urgency so they’ll purchase quickly so they don’t miss out.
Remember, your readers may be a little skeptical at first. Reassure them by sharing all the valuable content they are going to get for that low price. Let them know that successful and reputable bloggers put the bundles together. This way they’ll feel more confident in their purchase.
What I love most about the Ultimate Bundles affiliate program
It’s easy to sell bundles because they help solve problems that people are having in their everyday lives
They’re easy to sell because of the extremely discounted prices and time-sensitive sales. People don’t want to miss a great deal!
If you contribute a product to a bundle, you get that bundle for free.
If you’re an affiliate, you get a free bundle after you sell 5 copies.
They offer cash bonuses and amazing prizes for top affiliates for each bundle.
No matter what niche you’re in, there’s a bundle for you!
They offer extensive and very helpful training to help you be successful when selling their bundles.
If you’re ready to start monetizing your blog, I would definitely recommend signing up with the Ultimate Bundles affiliate program. It’s a great way to start earning money quickly and easily.
Remember, as an affiliate, you’ll earn 40% commission on each sale, and as a contributor, you’ll earn 70% commission.
Are you a new blogger hoping to make money from your blog? Have you heard others say it’s impossible to earn money blogging when you first start? Not true! Keep reading to learn about the top 4 ways to make money as a new blogger.
Millions of new blogs pop up every week. But not all of them will make money.
Starting a blog is easy and pretty cheap. (With Blue Host you only spend $3.95 a month!)
Most blogs are hobby blogs, which are perfectly fine. Blogging is a great way to meet new people, learn about different cultures, and relieve some stress.
However, most bloggers want to get paid for their hard work. And if you want to earn money blogging, then you have to go about it the right way.
You have to put the required time and effort into your blog to build it into a profitable business.
Blogging is a business and should be treated as such.
*Post contains affiliate links. They are free for you to click on, however, I will be compensated if you make a purchase. This supports my family and I thank you for your support! To learn more, click here.
But it takes time to grow, just like any other business.
With some dedication and the right mindset, you will succeed in your blogging business.
If you’ve already started your blog, then this guide is for you!
If you haven’t started a blog yet, but want to, click here to learn how.
How to Make Money As a New Blogger
Believe it or not, it is possible to make money as a new blogger.
I started blogging as a hobby and I loved it. I enjoyed sharing my crafts and DIYs with others.
As I started to gain more traffic I decided I wanted to start earning money from all my hard work.
So I started researching “how to make money blogging” and quickly became overwhelmed.
There are millions of people out there writing about how to make money blogging!
If you’ve been researching different ways to make money blogging and getting overwhelmed, don’t give up.
I’m here to tell you that it is possible to make money blogging.
And yes, you can make money as a new blogger, too.
Top 4 ways to make money as a new blogger
As an established blogger, there are many ways to monetize your blog. However, new bloggers are limited when it comes to making money.
Here are the top 4 ways to make money as a new blogger:
Ads
Affiliate marketing
Sponsored posts
Products
1. Monetize your blog with ads
Almost every blog you visit has ads. (Sometimes too many!)
Many bloggers allow ads on their site because they are easy ways to make money.
However, top paying ad networks, such as Mediavine, require you to have a substantial amount of traffic.
New blogs don’t start out with a lot of traffic. But that doesn’t mean you cannot have ads on your site.
Google Adsense and Media.net both allow new bloggers to monetize their site with ads. Pay is decent with both companies.
Media.net uses ads that are keyword links, which generally get more clicks. Most companies pay more for clicks than impressions.
You can have both Google Adsense and Media.net on your site, however, you want to be careful not to have too many ads. This slows down your site and it’s highly annoying to visitors and readers. It will cause you to lose traffic.
Media.net doesn’t overload your site with ads, but Google Adsense will.
To learn more about Media.net and sign up for free,click here.
2. Monetize your blog with affiliate marketing
I’m sure you’ve visited a blog that has recommended some type of products. They include links to the products they are recommending.
These links are called affiliate links.
Every time someone clicks on the link and makes a purchase, the blogger will get paid for it.
The top affiliate links I recommend to make money as a new blogger are:
These affiliate links are all free to join and work best for every niche.
If you choose to include affiliate links on your blog, you must include a disclosure statement somewhere on the post with the links. (I also include my disclosure on my privacy and disclosure page.)
Click here to see how to set up a disclosure page.
An example of a disclosure for sharing affiliate links is:
Disclosure: This post may contain affiliate links, meaning I earn a commission if you click through and decide to make a purchase.
Amazon requires that you have a separate disclosure to share links recommending their products. An example would be:
As an Amazon Associate I earn from qualifying purchases.
Honesty is the best policy when it comes to affiliate links. Only recommend products that you trust and love. This builds trust with your readers and they’ll be more inclined to make a purchase through your link.
Your readers trust and value your opinion. Recommending products you actually use will have a higher chance of being purchased. And you’ll have a higher chance of readers purchasing more products through your links in the future.
3. Monetize your blog with sponsored posts
A sponsored post is a dedicated post that promotes a certain product or company. A company will pay you to present themselves or their product to your audience.
Some examples of sponsored posts include:
product reviews
recommendations
articles about the company
To get sponsored posts, reach out to a company and pitch your promotion to them. A lot of companies have links to be able to contact them on their website.
Sponsored posts are an excellent way to make money as a new blogger. Some bloggers make all their money from sponsored posts alone.
4. Monetize your blog with products
Another great way to make money as a new blogger is to sell your own products.
Right now, the top selling products for bloggers are digital products.
With digital products, there is no inventory to keep up with and no shipping costs.
The biggest digital product sellers are eBooks and eCourses.
eBooks can be made by simply combining several blog posts together that you’ve already written.
Now that the series is over, I’m working on turning it into an eBook that I hope to have finished in a few months.
If you choose to write an eBook to sell to your audience, you can design the cover easily with Canva. I love using Canva because it’s so easy to use and they already have templates available for you. Plus it’s free!
PicMonkey is another program to use to design your eBook cover. They’re also free and easy to use.
eCourses allow you to teach others about a skill you’re very knowledgeable about. People love learning new things! And chances are you have something to teach them.
Online learning is in high demand, which is great news for you if you have a skill to teach.
Teachable offers a free plan that allows you to create and host your eCourse. They also offer great tutorials on how to get started and their site is user-friendly.
Printables are also great products for new bloggers to sell to make money. Printables can be easily created with Canva and PicMonkey.
Top selling digital printables include:
checklists
planners and calendars
templates (cover letters, forms, resumes, etc.)
budget trackers
personalized invitations or announcements
Many bloggers create printables as a free incentive to get visitors to sign up for their email list. But, you can also create them to sell on your own site or Etsy.
By the way – having an email following is KEY to making money with your blog. If you haven’t set up your email yet, I recommend using CovertKit. It’s free to sign up, easy to manage, and they have the most user-friendly opt-ins.
Now you have your blog and email opt-ins up and running, you need more traffic.
You cannot make a lot of money as a new blogger without a lot of traffic.
There are many different ways to drive traffic to your blog, but what you really want is for your blog to rank on Google. To do this, you need to learn and master SEO and keywords.
Long Tail Pro is a great tool to use to search for keywords. It shows you exactly which keywords people are searching for.
Conclusion
Don’t let the negativity of others scare you away from blogging. Don’t let them tell you that there is no way to earn money with a blog.
It’s just not true!
There are many established bloggers out there who make a lot of money blogging and it’s their full-time income. They make a living from their blog and the products they create. And some make 7 figures!
And it’s also possible to make money as a new blogger!
Just don’t give up.
Hold yourself accountable and put yourself out there.
Are you struggling to drive traffic to your blog? You’re not alone. These strategies have been proven to help you gain more traffic to your blog.
Have you ever looked at your blog’s analytics and just hear crickets?
You’ve worked so hard and written a great post and now you’re wondering when all the people are going to start showing up.
I get it! I’ve been there, too.
When I started my first blog, I wrote a lot of posts before I finally had one reader. I was so excited! Slowly more people started following my blog, but most of them just wanted follow-backs. They never even read my posts.
After a while, I started to figure out that I needed the “right audience” to gain the blog traffic that I needed.
*Disclosure: This post may contain affiliate links, meaning I earn a commission if you click through and decide to make a purchase. Thank you for supporting my blog!
Why the “right audience” matters
More traffic doesn’t always mean better.
Your goal should be to bring in targeted traffic that is relevant to your blog. There needs to be a reason for people to come to your blog. These people have something specific they are looking for. If you are not providing them with the answers that they are looking for, then they’re not going to stick around.
The “right audience” for your blog is the audience that becomes faithful readers. They sign up for your email list because they want to learn more from you. They quickly become your supporters. Learning the right people to target is the best way to drive traffic to your blog.
Strategies to Drive Traffic to Your Blog
1. Create audience profiles
Before you start creating content, you need to figure out who your target audience is going to be. Your content needs to focus on your targeted audience in order to drive more traffic to your blog.
Get a piece of paper and write down these questions:
– How old are they? – What is their gender? – Are they married? – Where are they located? – What are their occupations? – What is their income level? – What nterests and hobbies do they have? – Do they use social media? – How much time do they spend online each day?
The more details you know about your target audience, the more you will succeed within your niche. Your content will start bringing in the right audience and this will increase blog traffic.
2. Find your blog niche
Your blog niche is the topic all of your content will be focused on. It’s important to figure out your niche before you start your blog.
Finding your blog niche can be done in 2 simple steps:
First, make a list of everything you’re passionate about and want to share with others.
Then, narrow down that list to pick one or more topics you want to write about.
Keywords are very important when it comes to SEO. Doing keyword research will help you discover what others are actually looking for. Also, you will be able to find unique content ideas and you can learn from your competitors.
The best way to do keyword research is to use tools such as SEMRush. Once you get to the site, enter a keyword and your competitor’s blog URL (or your own) to find more keywords.
Learning SEO and how to correctly research keywords are very important at getting you ranked on the top pages of Google. When someone is searching for a keyword you’ve used, your post will come up. Getting your site ranked within the first 3 pages of Google is the quickest way to increase blog traffic. Social media and Pinterest aren’t always as reliable at bringing more traffic to your blog.
4. Plan traffic generating content
– Select the right topic
Before you sit down to write your first blog post, you need to think about the topic you’re going to write about. If you’re writing about a topic that nobody is interested in, then you’re not going to get any traffic at all.
Here are some ways to figure out what other people are interested in:
Read lots of other blog posts
Visit forums
Visit Quora and see what questions are being asked the most
Use Google Trends to see what search terms are most popular
Use SEMRush to find out what keywords your competitors are ranking for in Google
It’s important to remember that the topics you are writing about stay within your niche. Your goal for increasing blog traffic is to bring in the “right audience” and answer their questions.
Certain types of content get more attention than others.
Content that includes lists and infographics tends to get more shares than other types of content.
For me personally, list posts seem to get shared more than any other post. They also generate the most traffic to my blog.
– Add value to your post
There are probably a lot of other articles out there that are very similar to what you’re writing about. The key is to stand out from those other writers. You need to figure out what makes your content different from all the rest.
Maybe you go with a different angle or go into more detail. Or perhaps your posts are much easier to read or include more depth.
The main idea of writing great content is to find the key that separates your content from all the others. If your content is the just the same thing someone has already read before, they’re not going to keep reading. Your posts need to be full of valuable content to bring in readers and drive traffic to your blog.
Headlines matter. They’re like the first impression of our posts. The goal of an attention-grabbing headline is to convince people to read what you’ve written. And what better way to increase blog traffic than to lure them in with an attention-grabbing headline.
Here are four tips to remember when writing your headline:
1. It should be unique
If your headline is just like everyone else’s, then you’re not going to stand out. Readers will think you’re just like all the rest and they won’t have any reason to keep reading.
Your headline should have a personality. It shouldn’t be boring and robotic.
2. Use numbers
People love numbers. Since list posts are so popular using numbers in your headline will almost always guarantee your writing will be read.
3. Be specific
Try to summarize your content’s main point into one sentence. Just keep it simple and write exactly what your main point is. Then you can polish it up and create a specific and attention-grabbing headline.
4. Use adjectives
Use adjectives in your headline that trigger emotions, such as:
Excellent
Simple
Valuable
Mind blowing
Proven
Using emotion-evoking adjectives in your headline will grab readers’ attention and make them want to read more.
6. Update old content
You should always update old content if you want to drive traffic to your blog. When your content becomes outdated, it’s not as helpful to readers. Plus, outdated content will not rank as high in search engines. They like fresh content.
To see which blog posts you should update first, check your analytics. Find the posts that don’t get as much search traffic anymore. Update those posts first. Fill them with keywords and add or update images and graphics that help the reader understand your content better.
One rule of blogging is that you should always be writing. Either writing new content or updating existing content. Writing daily will improve your writing overall. Practice makes perfect! Once your writing improves and your content gets better, your blog traffic will increase because you’ll be ranking higher on Google.
7. Make your content visual
Visual content will almost always get shared more than text, therefore driving more traffic to your blog. People love seeing images and graphics and nowadays videos are more popular than reading.
Here are some ways to make your content more visual:
Create a unique featured image
Use graphs and charts to help readers visualize data
Embed a video
Include a shareable infographic
Add screenshots
Include a unique graphic
Include a meme or cartoon
8. Make your content readable
Humans have a short attention span. We need to be able to glance at a site and easily scan the contents. If all the words are jammed together in one long paragraph, readers are not going to stick around.
To solve this problem, our content should be easy to read. Use smaller sentences and paragraphs to break up the content.
Also, consider using bullet points and lists in your posts. Use bold print to highlight your most important points. And don’t forget to include the visual aspects.
9. Mention influencers
In your next blog post, link to other posts written by influencers specific to your niche. However, you should only mention them if it adds value and helps your readers. Don’t just mention them because you want to increase blog traffic. That’s not going to work.
After you’ve mentioned them in your post, reach out to them and let them know that you did so. People love to share stuff about themselves so more than likely they’ll share your post with their audience.
A great way to mention an influential blogger on your blog is to interview them. Readers like to get another person’s perspective on certain topics.
Also, you can invite influential bloggers to contribute to your blog. This can be a great way to get more content and drive traffic to your blog.
10. Improve your site
Redesign your site
Your site’s design really does matter. Having a clear site that readers can enjoy will keep them coming back.
You don’t even have to be a developer or designer to have an impressive site design. WordPress offers many free themes or you can choose a paid theme. Paid themes do get updated more often and tend to work longer than free themes.
Remove distractions
Everything on your blog should have a purpose. If you have distracting ads or pop-up videos that can’t be closed, readers are not going to stick around. You want readers to stay on your site and browse around. Nothing makes me leave a site faster than videos popping up and ads slowing the site down. I’m there for one reason – to read their content and find out more. Not to wait 3 minutes to close an ad before I can read anything.
Improve site speed
Page loading times are super important when it comes to your blog. If people come to your site and your page takes too long to load, they are going to leave.
Check your site’s speed with tools such as Google’s PageSpeed Insights. It will give you an idea of how to improve your pages’ load times.
– Add internal links
When you write a blog post, always include links to other relevant posts that you’ve written. This makes it easier for readers to find your best content and also keeps them on your site longer. It also makes it easier for search engines to index your content. Your number one goal is to drive traffic to your blog and your second goal is to keep them on your site longer.
– Add social sharing buttons
You want to make it easier for readers to share your content with their audience. They might want to email your post to their family and friends or pin it to Pinterest for later reference. Pinterest is a great way to bring in traffic to your blog, too.
11. Build an email list
Having an email list is one of the most important things you can have for your blog. You can send a weekly email to your readers sharing the content you posted for the week. They’ll be able to easily access the links in your email, bringing them to your blog week after week.
Offer readers a reason to sign up for your emails. For example, offer a free printable checklist or worksheet relevant to your niche. If you write about blogging, offer a free blogging content calendar or a list of 100 blog post ideas. People need a reason to sign up for your email. If they feel it’s not worth it then they’ll never sign up. Drive traffic to your blog with free incentives for signing up for your email list.
One of the easiest ways to increase blog traffic is to guest post for another blogger. By guest posting, you are getting yourself out there and making yourself known.
Ask a fellow blogger in your niche if you can write a guest post for their blog. If they say yes, return the favor and let them guest post for yours.
You can also add a “work with me” page on your blog letting others know you are willing to guest post for them.
13. Comment on other blog posts
Leaving helpful comments on other blogs is not only a nice way to meet other bloggers. It’s also a great way to get noticed. More than likely the blogger will visit your blog and return the favor.
However, don’t leave comments with your blog link requesting they read your blog. This is a turnoff and the comment will probably just get deleted or put in spam.
Focus your comments on being helpful and building relationships. These relationships will eventually open doors for you.
14. Pin your content daily
The majority of my blog’s traffic comes from Pinterest. I create and schedule 8-10 new pins every day. My pinning schedule runs from 8am to 10 pm with fresh pins being shared every 2 hours.
Some bloggers will tell you to pin way more, but I personally don’t feel like you need to do more than that. At least 5 pins a day is fine. It does take a little while for pins to get noticed and be shared, but it does happen.
Tailwind is a great scheduling tool to make Pin sharing so much easier. It can get rather overwhelming trying to manually pin those pins every day. Try Tailwind free here.
15. Learn SEO
Perfecting SEO is one of the best things you can do for your blog content. Good SEO makes your site more search engine friendly. I’m not going to get into SEO here, but there are tons of free advice step-by-step tutorials online.
Good SEO also gets you ranked higher in Google, which increases blog traffic.
There are always questions being asked on social media sites such as Twitter and Facebook. Use these questions to drive traffic to your blog. Jump right into these conversations by adding a link to your relevant content.
17. Track your keyword rankings
After you’ve created and promoted your content, you need to start tracking its performance. You can do this with Google’s free tool: Google Search Console.
This tool will give you a full view of all the keywords your website is ranking for. You can also view your top-performing keywords and see a list of potential keywords that will help you drive traffic to your blog.
You should seriously be using Google Search Console from the very beginning.
18. Track site traffic and user engagement
Google Analytics is another important tool you should be using for your blog. This tool tracks visitors to your site and lets you know where they are coming from. You can also see what they’re doing while on your site. This can be very helpful in knowing what’s working for your site and what’s not. Once you find out what people visiting your site are most interested in, you can start increasing traffic to your blog by writing more posts on that topic.
19. Be a podcast guest
Podcasts have become extremely popular over the years. There are tons of people that create podcasts on topics you write about. Seek them out and pitch to be a guest on one of their podcasts. Do a Google search for top podcasts in your niche and pick a few to pitch to.
20. Offer free stuff
Everyone loves getting something free. The right template given out for free can really drive traffic to your blog. Offer something related to your blog’s niche such as a checklist, a worksheet, an eBook, or even a free mini-course.
If your audience knows that you are offering free templates, they’ll stick around for more. And more than likely they’ll share that info with others, bringing them to your blog, too.
Do you have any proven tips to drive traffic to your blog? I’d love to know what works best for you!
Promoting and driving traffic to your blog isn’t exactly the easiest thing to do. Keep reading to learn about sites you can use to promote your blog for free.
Driving traffic to your blog can be such a struggle. I know! I get it!
You write an amazing article (link), hit publish, and assume millions of people are going to read it immediately. Only there’s just the sound of crickets as you check your site analytics.
The truth is, nobody knows you’ve written anything.
So how do you get yourself and all of your must-read content out there? You have to promote your blog and your brand.
Why should I promote my blog?
Promoting your blog posts is probably the most rigorous side of blogging. Twenty percent of your work will go to writing, while the other 80% will be all about marketing, promoting, emailing, networking, etc.
If you do not promote your blog – no one will know it’s there.
You may have the best content there is, but there will be no one to read it.
Writing great content isn’t always enough to get readers to your blog. You have to know how to promote it, too. Otherwise, all that hard work will be wasted.
Where to promote your blog for free
*Disclosure: This post may contain affiliate links, meaning I earn a commission if you click through and decide to make a purchase. Thank you for supporting my blog!
1. Medium
Medium is an online publishing platform with nearly 100 million visitors per month. A lot of freelance writers post their blogs on Medium so it’s a great place to promote your blog. Both writers and bloggers can share their content and also get paid.
You can think of Medium as sort of the YouTube of writing. It’s free to write on, but if you’re just there for the articles, you’re only allowed to read 3 per month for free.
2. Pinterest
Pinterest is a great place to bring in traffic for your blog. There are over 250 million people using Pinterest and 90% of them use it to make purchase decisions.
You can promote your blog to Pinterest for free while also building a community and driving traffic to your site. If you’re looking to make your Pinterest bio and boards more SEO friendly, I’d recommend having an expert help you. Christina Faye Creative did an excellent job fixing my Pinterest which helped bring a lot of traffic to my site.
Pinterest has group boards you can join as well. This site has a list of boards you can join by niche.
3. Instagram
Instagram is a great social media site to use for blog promotion. Especially since there are over one billion monthly users on the platform. You can share photos and put your blog link right in the bio section. Also, you can use tags so others can easily find your content.
Once you have 10,000 followers on Instagram, you’re allowed to place links in your stories.
4. Flipboard
Flipboard started out as a magazine-style feed reader. It is now one of the main choices for feed reading.
Basically, you’re flipping your content into a magazine, which you can also promote on social media sites. It takes a little while to get used to using Flipboard, so you may want to take some time to learn how to use it first.
5. Facebook Groups
Facebook groups are one of the top ways to reach users, especially since over a million people use them. You can create your own group, which works really well for craft and food bloggers. Creating your own group allows you to share content from others as well as promote your own blog content.
Or you can join other Facebook Groups in your niche that allows you to share your content.
6. YouTube
When you post an article to your blog, consider turning it into a video and sharing it on YouTube. It seems that nowadays people are turning more to video than reading. Get this – at least 5 billion videos are being watched on YouTube every single day! I’d say YouTube is a great way to promote your blog posts and get noticed.
7. LinkedIn
Another great place to promote your blog posts for free is LinkedIn as a link in a share. Or, you can create an article right on LinkedIn.
One of the best things about this site is that most of the users are professionals. Therefore, your content can be seen by hundreds of influential professionals within your niche. What a great way to get freelance work!
8. Twitter
I know Twitter has gone a little crazy lately, however, it’s still a great place to share your blog content. You can add photos and links right to your posts. Also, you can join in with other bloggers and create a community. Sharing each other’s content is really helpful in bringing traffic to your site.
9. Email List
I know you probably hear this a lot, but having an email list is extremely important for your business. Your email list is your blog’s most valuable asset.
People who sign up for your email list are your most avid readers. They know you and trust you and support you.
Convert Kit has simple features to make growing your email list easy. And it’s used by a ton of bloggers! It was created for bloggers by bloggers, so they understand exactly what you’re looking for.
You can sign up for a free Convert Kit account here.
10. Quora
Quora is a question-and-answer site. When someone asks a question on the site, you can link your content to it as a relevant answer. Not only does this answer their question, but other readers will click on your link to read your content as well.
The aim here is to get a lot of upvotes. When you get the most upvotes from the community, your answer will show up first.
Tip: Be sure to focus on questions within your niche.
11. Reddit
Reddit is a large online community sharing almost every topic you can imagine.
You must be an active member and provide value first. Remember to search for subreddits in your niche to contribute to. That way you’ll be able to add links where applicable, driving traffic to your site while promoting your blog for free.
12. Bloglovin’
Bloglovin’ automatically pulls your latest blog content and shares them to their site in various categories. This way the Bloglovin’ community gets to see your newest articles and they’ll visit your blog for more information.
Also, you can follow your favorite bloggers for their latest content. And hopefully they will follow you back.
13. Mix
Mix is somewhat similar to Flipboard with its magazine-like features. However, if one of your articles starts to trend on Mix, then you have the opportunity to bring in thousands of new readers. I’ve used Mix for a while, but I honestly have to say that I have no idea how it really works. I share (or “mix”) other bloggers’ content as well as promote my blog on there.
14. List.ly
List.ly is all about creating lists. You can create tips lists or lists of anything you can think of! List.ly lets you create a list on their site, embed it to your blog, and then lets others add to your list. This keeps your blog posts current and updated for you.
List.ly allows you to add external links with your listed items so you are building backlinks to your blog. And you might get lucky and have List.ly feature your list on their homepage, which means a lot more traffic to your blog.
There are many different options for getting yourself and your articles out there. I would recommend trying different sites to promote your blog and seeing what works best for you. When you find the best option, learn it and stick with it.
However, I would not recommend promoting your blog on more than 2 or 3 sites, to begin with. You will get overwhelmed and that may decrease your motivation to keep going.
The most important tip I can give you for driving traffic to your site is to be patient. Increasing blog traffic isn’t something that just happens overnight. But, no matter how long it takes, don’t give up. You will get there!