A privacy policy page is a must-have for bloggers, so don’t skip this page. In this article, I’ll go over why a privacy page is so important as well as show you how to create one.
Your blog has been created and you have some posts written. You’re good to go, right?
Not so fast.
Every blog needs a privacy policy page in order to comply with state, federal, and global laws. These laws protect consumer privacy rights in every state.
Refusing to follow these laws can land you some hefty fines.
But, don’t worry. Creating a privacy policy page for your blog isn’t difficult and can be done fairly easy. I’ll show you how!
First, let’s go over what the heck this page even is.
To read about all the important pages your blog should have, click here.
What is a privacy policy page?
Whenever you visit any website, you are leaving behind pieces of information. This includes your name, email address, IP address, and more.
The purpose of this page is to disclose:
what information the website collects
what the website does with collected information
who else has access to that information
how the information is protected
how long the information is kept
Creating a privacy policy page protects you from legal liability and protects your readers from any potential privacy breaches.
Since just about every website you visit is collecting privacy information, you need to be protected.
How blogs collect private information
Blogs are no different that other websites when it comes to attracting an audience. We all want our audiences to eventually convert to subscribers. To do that, we have to collect their names and email addresses.
However, that’s not the only way blogs collect private information from readers. The list goes on and on.
How private information is collected:
List sign up forms (so readers can sign up for your email list)
Contact forms
Chat tools (require email or other personal information)
Social sharing tools (anytime a reader shares your blog post)
Comment form
Ecommerce (for online stores)
Cookies (most websites require that you accept the cookies)
Third party services (such as ads)
If your blog has one or more of these items (and most likely it does) then you must have a privacy policy page to comply with the rules.
How to create a privacy policy page
To begin with, let’s go over what this page should have and do.
A privacy policy page should:
be well written and easy to understand
identify all the possible ways your blog is collecting readers’ personal information
include information you collect directly (ex: pop-up forms) and indirectly (ex: ads)
acknowledge your respect for and regard to all applicable laws
My favorite way to create a privacy page is with a privacy policy generator. This is so simple – just fill out some information and the generator does all the hard work for you.
The generator I use for my page is PrivacyPolicies.com. It’s super simple and the best part is that it’s free to use!
After filling out all of the required information, you have the option to download it or copy and paste it right into your page.
They also offer free clauses for analytics tools and ads. If you want anything extra, you will have to pay for it.
Where to place the page on your blog
After you’ve created your privacy policy page and published it, you want to make sure it is somewhere that it can be seen. This can include your footer, your sidebar, or in a secondary menu. A link to the page can also be placed in a sub-menu as a drop-down under your “about” section.
You must familiarize yourself with all the legalities if you are serious about running a successful money-making blog.
Do you really need an about me page for your blog? We’ll cover that answer and more in this article on creating an amazing about me page.
You may be asking yourself if an ‘About Me’ page is really important for your blog. Guess what? It is!
An ‘About Me’ is usually where potential clients go first because they want to learn more about who you are what it is that you do.
This page is also a great way to promote your brand.
The con of writing an ‘About Me’ page is that it’s not exactly easy to do. However, if you follow my tips you will be creating an amazing ‘About Me’ page with no problem whatsoever.
Why do you need an ‘about me’ page?
Believe it or not, your ‘about me’ page isn’t about you at all.
It’s about the person who clicked on the link to get to the page.
Consider your ‘about me’ page your interview with your readers. You are working on building a trusting relationship and connecting with your readers. Also, you want them to understand exactly why they need you to help them over anyone else.
What exactly is an ‘about me’ page?
Most of the time the ‘about me’ page is the first page a new reader visits. So it’s very important to have a link to this page somewhere you know readers will see it immediately. It’s also usually the most visited page on your site.
Whenever a new visitor comes to your site they want to learn more about who you are as a person or as a business. They want to hear your personal story as well as how your business came to be. This page is where you will build trusted relationships with your readers and keep them coming back.
An ‘about me’ page is your chance to connect with your audience and keep them intrigued. You want to convince them you are the person they should be working with. You need to include your bio, your credentials, and your story.
Creating an amazing about me page step-by-step
Step 1: Trigger a feeling
The very first thing you want to do when writing an ‘about me’ page is to grab the reader’s attention immediately. This can be done with a statement that triggers a feeling in the reader.
Let the reader know that you understand why they visited your site. Ask questions about your business and if the reader answers “yes” to more than one question, they know they are in the right place.
Example: Are you always to busy to elaborate meals? Are you constantly too tired to cook? Are you eating out more than eating at home? Then you’re in the right place!
Step 2: Get into their heads
The second section an ‘about me’ page should allow people to decide whether or not you are the right one for them. Use empathy to get into their heads and make them believe you really understand them.
Stir up their emotions and really get them on your side.
Example: “You’ve tried everything to lose weight and nothing is working. You’ve cut out carbs and sugars and it’s still not working. It’s frustrating and depressing. Believe me – I get it! I’ve been there, too!”
Step 3: Brag through others
Sure we can brag on ourselves all day, but other people get sick of that eventually. What they want to know is what other people are saying about us.
What other people are saying about us speaks louder than what we can ever say about ourselves.
While you are creating an amazing ‘about me’ page for your blog, add a section of testimonials and social proof of others speaking for you. This lets your readers picture themselves as part of your community.
Example: “What others are saying about me.”
Step 4: Add your bio
Once you have proven to your audience that you deeply care about them, tell them more about yourself.
Make a personal connection with your readers by
stating why you do what you do
stating your mission
using a short story to sum up your background (make it memorable)
including a photo or 2 of yourself
People connect with other people. They want to see faces and learn names.
Step 5: Ask them to keep in touch
To make sure your readers are going to stick around, ask them to keep in touch by signing up for your email list. You could offer an incentive to get them even more excited to join, such as a free resource or ebook.
Include multiple options for readers to sign up for your email list throughout the page. Your first option should go under the second section – after you’ve told them exactly why they need you. The next option should be after your testimonials and social proof and the last option should be at the very end of the page.
My best tips:
When creating an amazing ‘about me’ page you want to use your own writing voice.
Don’t be afraid to use a little humor, just don’t overdo it.
Make sure you include your name and your credentials.
Add a photo to let your readers see what you look like because this builds trust.
Don’t drag your story out, get to the point.
Remember: your ‘about me’ page isn’t about you at all.
A “Start Here” page, also sometimes called “Begin Here” or “[Your Blog Name] 101”, is a page on a blog that’s designed for new visitors. It’s kind of like a tour guide: it helps them navigate the blog’s content efficiently.
Here’s what a Start Here page offers:
Introduction: A brief overview of the purpose of your blog, the topics you write about, and the value your posts provide to readers.
Content Highlights: Includes your blog’s most popular posts, categorized by topic or theme. This lets new visitors find the topics they’re looking for easily.
Navigation Guide: Blogs can accumulate a large amount of content over time, so a Start Here page can help readers understand how your blog is organized. It might explain categories, tags, or how to search for specific topics.
Call to Action: This could be anything from subscribing to your blog’s email list to following you on social media.
The goal of a Start Here page is to improve the experience for new visitors by:
Reducing bounce rate: Giving visitors a clear direction makes them less likely to get lost and leave the blog altogether.
Increasing engagement: Highlighting your best content gets visitors hooked and encourages them to explore further. And possibly sign up for more so they never miss a post.
Building a community: A Start Here page can also be a platform to introduce you and your personality, which proves you are a human that readers can relate to.
Basically, a Start Here page is a valuable tool for bloggers to make a good first impression and turn new visitors into loyal readers.
What’s the Difference Between a Home Page and a Start Here Page?
A home page is meant to catch attention. It let’s visitors know what you do and how you can solve their problems.
On the other hand, a start here page leads visitors in the right direction and draws attention to your best content.
How to Write a Start Here Page for Your Blog
Step 1: Make a memorable first impression.
The first line of your Start Here page must grab the attention of the reader immediately. Sometimes, readers will only look at this page so you only have a few seconds to grab their attention and keep them reading.
Create a headline that offers a solution to their problem, such as:
“Are you dreaming of working from home and spending more time with your family?”
“Have you tried to lose weight but find it impossible?”
“Is your home filling up with too much stuff? Let’s unclutter together!”
Step 2: Create a human connection.
Be personal and vulnerable. People like reading stories about others that they can relate to. Don’t just share all of your achievements, add in some struggles you’ve encountered, too.
The idea here is to relate to your ideal reader on a personal level. Think of yourself as talking to a friend.
Be sure to include a photo of yourself, preferably one of you with a smile.
Example: “Hi! I’m ___________ and I really enjoy ______________ but not ____________.”
Step 3: State who you are helping.
Be very clear upfront on exactly who your target audience is. If you’re trying to help bloggers learn how to make money, then someone who’s looking for recipes will know they can’t find any on your site.
Also, be sure to state the purpose behind your blog. Are you writing to educate, inform, entertain, solve a problem?
This is the step that is answering your reader’s questions: “What’s in it for me? What can you do for me?”
Example: “Let’s cut to the chase: this blog is for you if you’re an aspiring blogger anxious to turn your passion into profit. Feeling lost in a sea of information on how to make money blogging? We’ve all been there. That’s why we created this resource – to guide you through the process, step-by-step.”
Step 4: Explain exactly how you are going to help.
After focusing on who you are going to help, state exactly how you plan to help them. What can you do for them that others can’t?
Example: “I’ve been helping new and established bloggers build and grow a successful money-making website for 5 years.”
Step 5: Prove it.
Here is where you get to show off your credibility so you need to share visible proof of your expertise.
You can do this by sharing testimonials from clients, social proof (followers), blog traffic stats, income reports, academic or corporate background.
Another great way to prove your credibility is to share logos from big sites that you’ve collaborated with on your page.
Example: “See what others are saying!” (Share a few testimonies.)
Step 6: Convert readers to subscribers.
Now you’ve made a personal connection with your readers and you have proven you can help them solve their problems.
By now they are loving you, but chances are they may not remember to come back to your site.
Include a call to action to get them on your mailing list. You can do this by adding a button that leads to a landing page or an embedded form on your contact page.
Example: “Don’t miss out on valuable insights and the latest strategies. Subscribe to my email list for exclusive content, actionable tips, and inspiration delivered straight to your inbox. We offer a hassle-free unsubscribe option, so you’re always in control.”
Also add your social media links and ask readers to engage with you there. This will make you stand out as well as make you more memorable. And remember to be active on social media!
Example: “Want more awesome tips and connect with a supportive community of fellow bloggers? Follow me on social media!”
Step 7: Show them your best content.
Make it easy for readers to find what they’re looking for by adding links to your most popular posts. You can also use thumbnail images for visuals.
Example: “Readers also love these: (link to posts)!”
What Should I Put on My Start Here Page?
When thinking about what to put on your Start Here page, ask yourself these two questions:
What do I want visitors to learn about when they find my website?
How can I let visitors know they are in the right place?
Make a list of things that answer those two questions. Then ask yourself:
Do these things add value to my audience and to myself?
Can I organize these things to make them flow well together?
If the answer is “no” to either of these, then you’ve identified something that doesn’t belong on the page.
Here are some ideas of what to include:
Featured opt-in: Make visitors feel welcome by offering them a free gift, such as a mini course, checklist, workbook, or anything else of value.
Your most popular posts: Or a list of posts that new visitors would find most helpful while learning about your topic.
Categories: Instead of a list of post, consider showing posts from specific categories. This lets visitors decide what they want to dig into first.
About section: Your Start Here page is a great way to introduce yourself.
Social media links: Make it easy for visitors to find and follow you on social media.
Products and services: Keep this short and sweet because first timers aren’t likely to buy from you. They need to know they can trust you first.
Where Should I Put the Link to My Start Here Page?
There are four places on your website that are best for placing the link to this important page:
In the top navigation bar on the left side: Since people read from left to right (in most languages), left is usually the direction the eyes go to first.
In the sidebar
A large call-to-action on your homepage
Your welcome email
My best tips:
Use shorter paragraphs that contain only 2-3 sentences to make your page easy to scan. Most of the time readers only read the first 2 sentences of a paragraph before moving on.
Speak like a knowledgeable friend, not a condescending jerk. You want your readers to like you and find you friendly. This helps them connect with you. If you speak like a know-it-all and talk down to them they may not stick around very long.
Tell your story in a relatable way. Use words that trigger certain emotions in your readers to make them feel your story is also their story.
Key Takeaways:
A “Start Here” page acts as a tour guide for new visitors to your blog, helping them navigate your content and understand what you’re all about.
This page can significantly improve the user experience by reducing bounce rates, increasing engagement, and fostering a sense of community.
To write an effective “Start Here” page, focus on making a strong first impression, showcasing your credibility, and providing clear calls to action for readers to subscribe or explore further.
Include elements like an introduction, content highlights, navigation guide, and links to your best content.
Remember to prioritize scannable content, a friendly voice, and a relatable story to connect with your audience.
Stuck staring at a blank blog page? Let me help you with finding your blog niche!
So you’ve got this awesome blog idea, but picking a specific topic feels like picking a winning lottery number. Don’t worry, figuring out your blog niche isn’t magic. It’s about combining what you love with what people are searching for.
When I started blogging years ago, I mostly wrote about my life. After a while, I started writing about gardening because that’s what I was learning the most about at that time. I wanted to share my experiences and what I had learned.
But then I realized that I didn’t really like gardening all that much. My mom has a green thumb and loves her plants, but I am the complete opposite.
Eventually, I started writing about what interested me the most and what I knew the most about – housekeeping. Finally finding my niche was exciting because it became so much easier to write posts. Plus I had a ton of post topics floating around in my head. My first blog (Blessings by Me) falls under the Lifestyle niche, with sub-niches about cleaning, organizing, home hacks, frugal living, etc.
So let’s dive in and learn more about niches and finding your blog niche!
(This post contains affiliate links, which means if you make a purchase through one of my links, I will get a small commission.)
What is a Blog Niche?
A blog niche is your blog’s area of focus, the specific topic you’ll be building your content around. Having a niche allows you to narrow down your targeted audience and write content that answers their questions and solves their problems. The content you write about is relevant only to your targeted audience.
Finding Your Blog Niche: Why Niche Blogging is the Key to Success
The key to establishing a successful blog lies in finding your blog niche. A niche isn’t just a trendy buzzword; it’s a strategic decision that focuses your content and builds a loyal subscriber list.
Here’s how a niche benefits your blog:
Targeted Audience: By focusing on a specific topic, you attract readers who are truly interested in your area of expertise. This targeted approach allows you to customize your content to their needs and interests, which builds a deeper connection.
Content Clarity: A niche provides a clear direction for your blog, preventing content from becoming scattered or irrelevant. This consistency builds trust and establishes you as a thought leader within your chosen field.
Search Engine Optimization (SEO): Search engines favor focused content. A well-defined niche makes it easier for search engines to understand your blog’s purpose, increasing your chances of ranking higher in relevant searches. This, in turn, drives more organic traffic to your site.
Things to Consider When Choosing Your Blog Niche
Choosing the right niche is important for building a strong foundation for your blog. When you’re truly passionate about your blog niche, creating content becomes less of a chore and more exciting. No matter what niche you choose, it should be a topic you’re truly interested in. This will keep you motivated to stick with it.
Here are some things to consider when choosing your blog niche:
1. Passion and Expertise:
Do what you love: This is where the magic starts. Choose a topic you’re genuinely interested in and enjoy learning more about. Your enthusiasm will translate into engaging content and keep you motivated in the long run.
Leverage your knowledge: Think about your hobbies, skills, or past experiences. Is there a topic you’re knowledgeable about that you can share with others?
2. Audience Interest and Profitability:
Market research is key: Once you have some niche ideas, see if there’s an actual audience for them. Use online tools like Google Trends or social media to see what people are searching for or what problems they have that need solving.
Monetization potential: Consider how you might generate income from your blog. Does your niche offer opportunities for advertising, affiliate marketing, or selling products/services related to your topic?
Here are some additional factors to keep in mind:
Competition: While a little competition is healthy, avoid oversaturated niches. Can you find a sub-niche within a broader topic to stand out?
Content longevity: Is your niche a fad, or does it have long-term potential? Choose a topic with lasting appeal to ensure your blog stays relevant.
Personal growth: Can you see yourself continuously learning and expanding your knowledge within this niche?
By carefully considering these factors, you can choose a blog niche that’s both fulfilling and sets you on the path to blogging success.
Most Profitable Blog Niche Ideas
When I started my first blog, I had no idea what I was doing. I didn’t know anything about SEO or that I could make money with my blog. I was doing it as a creative outlet. But I started seeing other bloggers talking about how they were making money blogging so I decided to do some research. What I learned was that any blog niche can make money. However, some niches are easier to make money with than others.
Here’s a list of the top blog niches that tend to be profitable:
Health and Wellness: People are constantly searching for information on how to improve their physical and mental well-being. This broad niche offers opportunities for content on fitness, nutrition, weight loss, mental health, and more. You can target a specific audience within this niche, such as vegan recipes, workouts for busy professionals, or meditation techniques for stressed moms. Wellness Mama is a great example.
Personal Finance: Financial literacy is a major concern for many people, making personal finance a profitable niche for bloggers. You can offer advice on budgeting, saving, investing, and debt repayment. If you feel that’s too broad of a niche, you can break it down into sub-niches such as real estate investing or cryptocurrency. Make Sense of Cents is a great example of this niche.
Technology and Gadgets: Tech enthusiasts are always eager to learn about the latest gadgets, software, and trends. Tech blogs can cover a wide range of topics, from product reviews to software tutorials. You can also niche down to focus on specific areas like artificial intelligence, cybersecurity, or virtual reality. Tech News World is a great example.
Food and Cooking: Food is a universal topic that never goes out of style. Food blogs can share recipes, restaurant reviews, or cooking tips. You can target a specific audience by focusing on particular dietary needs or cuisines. A great example is Pinch of Yum.
Travel and Adventure: People love to travel and read about new destinations. Travel blogs can share inspiring stories, practical tips, and beautiful photos. You can focus on a specific type of travel, such as budget travel, luxury travel, or solo female travel. Dive Into Malaysia is a great example of this niche.
Home Improvement and DIY: Many people enjoy fixing up their homes and doing DIY projects. Home improvement blogs can provide instructions on how to complete specific tasks, plus product reviews and inspiration. You can target a specific area of home improvement, such as gardening, woodworking, or plumbing. I personally love Family Handyman.
Finding Your Blog Niche: A How-To Guide
Finding your blog niche involves identifying a specific topic or area of interest that you’re passionate about and that has the potential to attract a dedicated audience. Here’s a step-by-step guide to help you find a niche for your blog:
Identify your passions and interests: Start by making a list of topics that you’re truly interested in and knowledgeable about. Consider your hobbies, experiences, expertise, and what you enjoy discussing or learning about.
Research audience demand: Once you have a list of potential topics, research to see if there’s an audience interested in those topics. Use tools like Google Trends, keyword research tools (such as Google Keyword Planner, SEMrush, or Ahrefs), social media platforms, forums, and communities to gauge interest and demand.
Analyze competition: Look at existing blogs and websites within your chosen topics to understand the competition. Evaluate the quality of content, engagement levels, audience size, and the monetization strategies they use. Assess whether there’s room for your blog to offer something unique or fill a gap in the market.
Narrow down your niche: Refine your topic to make it more specific. For example, if your initial interest is in fitness, you might narrow it down to a specific niche within fitness, such as body weight workouts for beginners or healthy recipes for busy professionals. A narrower niche can help you stand out and attract a more targeted audience.
Consider audience demographics: Think about the demographics of your target audience, including their age, gender, location, interests, and problems they’re looking to solve. Customize your niche to appeal to this specific audience.
Evaluate monetization potential: Consider the potential for monetization within your chosen niche. Explore different monetization options such as affiliate marketing, sponsored content, digital products, online courses, or advertising. Choose a niche where there are viable monetization opportunities.
Assess long-term sustainability: Think about whether your chosen niche has long-term potential. Avoid trends that may quickly fade away unless you’re willing to adapt your content over time. Aim for a niche that allows you to create evergreen content that remains relevant and valuable to your audience over the long term.
Test your niche: Before committing fully to your chosen niche, consider testing it out by creating some initial content and gauging audience response. Monitor engagement metrics, feedback from your audience, and any signs of growth or interest. Keep in mind, though, that this will take a while.
Be flexible and willing to adapt: Remember that your niche may evolve over time based on audience feedback, changes in your interests, or shifts in market demand. Stay open to adjusting your focus as needed to ensure the continued success of your blog.
What comes after finding your blog niche?
1. List of 50
Ready to brainstorm? With your niche identified, it’s time to generate content ideas! Find a quiet space at a library, coffee shop, or even your bedroom. Grab a pen and a piece of paper and start writing ideas for blog posts. Aim for at least 50 blog post ideas, broad or specific.
For example, if your niche is about home organization for busy moms, your list could include “30-minute cleaning hacks” or “Morning routine organization for a smooth start.”
Time to write! Choose 5 ideas from your list and start writing. These are drafts, so focus on getting your thoughts down – you can always edit and strengthen them later. Aim to complete these 5 posts within a week or two.
With this initial batch, you’ll have a solid foundation of content. Consistency is key – strive for one or two posts a week to build a strong presence in your niche. Remember, you can always add more ideas to your list as you go!
Conclusion: Finding Your Blog Niche
Congratulations! You’ve taken the important first steps of finding your blog niche. With a focused topic and a passionate drive, you’re well on your way to building a successful blog.
Here are some key takeaways to keep in mind as you move forward:
Content is king: Now that you know your audience, consistently create high-quality content that caters to their needs and interests.
Be a thought leader: Establish yourself as an authority in your niche by sharing valuable insights, conducting research, and offering unique perspectives.
Embrace community: Engage with your audience, respond to comments, and build a sense of community around your blog.
Promote your work: Don’t be afraid to spread the word! Utilize social media, guest blogging, and SEO strategies to reach a wider audience.
Enjoy the journey!: Blogging should be a rewarding experience. Let your passion for your niche shine through and have fun with the process!
Remember, success takes time and dedication. By following these tips and consistently putting out great content, you’ll be well on your way to becoming a successful blogger in your chosen niche.
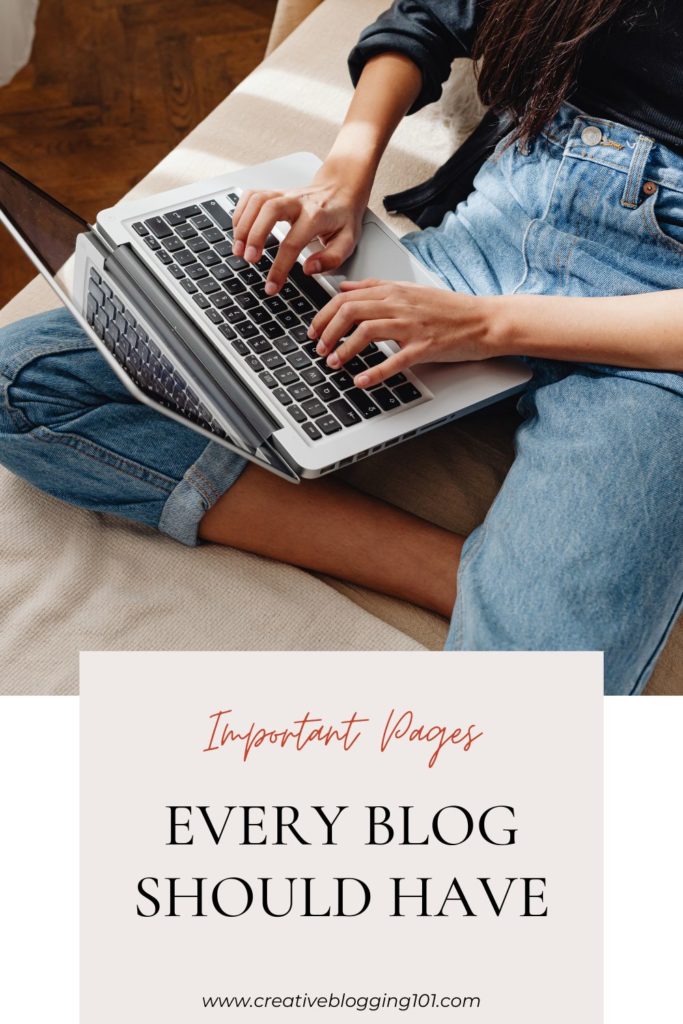
Launched your blog and wondering what other important pages you need? Besides your awesome posts, essential pages provide key info about your blog without cluttering it up.
Think of your blog as a house: posts are the ever-changing decorations and stories you share, while pages are the foundation – the essential info visitors always need.
Posts are where your articles and fresh content live. Pages, on the other hand, house timeless information about your blog, like “About Me” or “Contact.” This separation keeps things organized for your readers, making it easier for them to find what they’re looking for.
Let’s dive into the most important pages every blog should have!
A Start Here page, also sometimes called “welcome,” “getting started,” or “[Your Blog Name] 101,” is a special page on a blog designed specifically for new visitors.
Think of it as a roadmap or a friendly concierge for your blog. It acts as a central hub that introduces new readers to your blog’s purpose, explains who you are (or your team is), and helps them find the content they’re most interested in.
Here are some key things a Start Here page might include:
A warm welcome and introduction: Set a friendly tone and give new visitors a sense of what your blog is all about.
About you or your team: Briefly introduce yourself (or yourselves) and your area of expertise.
Most popular content: Showcase your best or most-read blog posts to give new visitors a jumping-off point for exploring your content.
Categories or tags: If your blog uses categories or tags to organize content, highlight the most relevant ones for new visitors.
Call to action: Encourage new visitors to subscribe to your blog, follow you on social media, or download a freebie.
Overall, a Start Here page aims to give new visitors a positive first impression and make it easy for them to navigate your blog and find the content they’re looking for. It’s not one of the most important pages every blog should have, but it can be a valuable tool for improving user experience and building a loyal readership.
An About Me page on a blog is like your virtual handshake – it’s a chance to introduce yourself (or your team) to your readers and build a connection with them. It goes beyond just listing your name and interests; it’s a space to tell your story and explain why you started the blog and what you’re passionate about.
Here’s why an About Me page is important for your blog:
Establishes trust and credibility: People connect with people. By sharing your story and background, you show your readers there’s a real person behind the blog, making your content more relatable and trustworthy.
Helps readers connect with you: An About Me page allows you to share your personality, voice, and values. This can help readers feel like they know you and make them more likely to return for your content.
Shows your expertise: Briefly explain your background and why you’re qualified to write about your chosen topic. This establishes your authority in the field and positions you as a valuable resource for your readers.
Highlights your blog’s purpose: Explain what inspired you to start your blog and what you hope to achieve with it. This clarifies your blog’s focus and helps readers understand if your content aligns with their interests.
Increases engagement: A well-written About Me page can encourage readers to subscribe to your blog, follow you on social media, or leave comments. It opens a door for further communication and a sense of community.
While it’s not mandatory, a strong About Me page can be a powerful tool for building a successful blog. It allows you to connect with your audience on a deeper level and create a loyal following.
A blog’s Contact Page is a digital bridge between you and your readers. It provides them with various ways to get in touch and offers several benefits for your blog’s success. Here’s a breakdown of why a contact page is one of the most important pages every blog should have:
Provides Accessibility:
The primary function of a Contact Page is to make it easy for readers to reach out. This could be for different reasons, such as:
Asking questions or seeking clarification on your blog posts.
Offering feedback or suggestions for future content.
Inquiring about collaborations or guest posting opportunities.
To share their own stories or experiences relevant to your blog’s niche.
By offering a dedicated contact channel, you demonstrate openness to communication and encourage reader engagement. Here are some reasons a Contact Page is beneficial:
Increases Credibility: A professional-looking Contact Page with clear information adds a layer of legitimacy to your blog. It shows you’re serious about building a community and value your readers’ input. This can be particularly important if you’re trying to establish yourself as an authority in your field.
Provides Business Opportunities: The Contact Page can also be a gateway for potential business opportunities. Businesses or brands related to your niche might reach out through the contact form for collaborations, sponsored content, or advertising inquiries.
Helps With Customer Service: Even for blogs that don’t directly sell products, a Contact Page allows you to address reader concerns or troubleshoot any technical issues they might face while navigating your blog. This fosters a sense of trust and builds a positive brand image.
Different Ways to Connect:
Modern Contact Pages typically offer multiple ways for readers to reach you, such as:
Contact form: This is the most common option, allowing readers to submit messages directly through your website.
Email address: Providing your email address gives readers a more personal way to connect, but be mindful of potential spam.
Social media links: Including links to your social media profiles allows readers to connect with you on those platforms and interact with your content there, too.
A blog’s Privacy Page is a legal document that outlines how you collect, use, and store information from your readers. It’s one of the most important pages every blog should have for two main reasons:
1. Transparency and Building Trust:
Informs Readers: Your Privacy Page clearly explains what information you gather from visitors (emails, cookies, etc.) and how you utilize it. This transparency builds trust with your readers, letting them know you respect their privacy.
Sets Expectations: The page outlines how you handle reader data, such as for newsletter subscriptions or comments. This sets clear expectations for your audience and avoids any potential confusion.
2. Legal Compliance:
Data Protection Laws: Many countries and regions have data privacy laws like GDPR (General Data Protection Regulation) or CCPA (California Consumer Privacy Act). A Privacy Page ensures you comply with these regulations and avoid legal repercussions.
Protects You and Your Readers: A privacy policy safeguards you from potential lawsuits or fines related to data privacy violations. It also protects your readers by ensuring their information is handled responsibly.
Here’s a breakdown of some key elements typically found in a blog Privacy Policy:
Types of information collected: This details what data you gather from readers, like email addresses, browsing activity, or comments.
How information is used: This explains how you utilize the collected data, such as for newsletters, personalization, or analytics.
Cookie policy: If your blog uses cookies to track user behavior, this section explains what cookies are and how they’re used.
Data sharing practices: This clarifies if you share any reader information with third parties and under what circumstances.
Data security measures: Outline the steps you take to protect reader data from unauthorized access or breaches.
Your readers’ rights: Depending on the data protection laws you comply with, you might need to explain user rights regarding their data, such as access, correction, or deletion.
Important Note: While there are free Privacy Policy templates available online, it’s recommended to consult with a lawyer to ensure your policy adheres to specific data protection laws and your blog’s unique data collection practices.
A Disclosure Page on a blog is a transparent statement that informs your readers about any potential conflicts of interest you might have when recommending products, services, or brands. A Disclosure Page is one of the most important pages every blog should have, especially if you plan to monetize your blog. Here’s why it’s important:
Builds Trust and Avoids Deception:
Reader Transparency: A DisclosurePpage lets your readers know upfront if you’re financially benefiting from promoting something on your blog. This transparency builds trust and avoids any misunderstandings about your recommendations.
Ethical Blogging: It showcases your commitment to honest and ethical blogging practices. Readers appreciate knowing they’re getting genuine recommendations, not just disguised advertisements.
Legal Compliance:
FTC Regulations: The Federal Trade Commission (FTC) in the US has guidelines requiring bloggers to disclose any material connections with brands or products they endorse. A Disclosure Page helps you comply with these regulations and avoid legal trouble.
Types of Disclosures Needed:
There are various situations where a disclosure might be necessary:
Affiliate Links: If you use affiliate links, which means you earn a commission if someone purchases something through your link, you need to disclose this clearly.
Sponsored Posts: If you’re paid to write a post about a particular product or service, you need to disclose that it’s sponsored content.
Free Products: If you receive free products in exchange for a review, you should disclose that you received them for free.
How to Write a Disclosure:
Clear and Concise: Keep your disclosure language clear, easy to understand, and readily visible to readers.
Specific About Relationships: Clearly state the nature of your connection with the brand or product being mentioned (affiliate, sponsored post, free product).
Placement: Disclosures are typically placed at the beginning or end of a relevant blog post, but some bloggers also include a general disclosure statement on their dedicated disclosure page.
Additional Valuable Pages
Resources Page
A Resource Page on a blog is a collection of helpful links and information relevant to your blog’s niche. It acts as a one-stop shop for readers to find valuable tools, articles, websites, books, or other resources that can help them understand your topic or help them achieve their goals related to it.
Here’s what a Resource Page typically includes:
Content:
Helpful Links: A Resource Page is a well-organized list of links to external resources. These can be other blogs, articles, websites, tools, apps, books, ebooks, online courses, or anything you deem valuable for your readers.
Categorization: To make the information easy to read, categorize your resources with clear headings or use tabs to separate them by topic or type (e.g., “Free Tools,” “Helpful Articles,” “Recommended Books”).
Brief Descriptions: For each link, include a short description that explains what the resource is about and why it’s valuable to your readers.
Benefits of a Resource Page:
Provides Value to Readers: A well-crafted Resource Page positions you as an authority in your niche by demonstrating your knowledge of the best resources available. It saves your readers time and effort searching for relevant information.
Boosts Engagement: By offering valuable resources, you encourage readers to spend more time on your blog and keep coming back for future recommendations.
Increases Credibility: Highlighting high-quality resources from other credible sources strengthens your own blog’s credibility and establishes trust with your audience.
Examples of Resources on a Resource Page:
The specific resources you include will depend on your blog’s niche, but here are some general examples:
For a food blog: Links to recipe websites, kitchen tool reviews, online cooking courses, meal planning apps, and healthy eating guides.
For a photography blog: Links to tutorial websites, recommended photo editing software, online photography courses, camera gear reviews, and photography inspiration websites.
For a travel blog: Links to travel booking platforms, travel apps, packing guides, destination guides, and travel blogs from other adventurers.
For a business blog: Links to productivity tools, project management software, marketing resources, business templates, and industry news websites.
Additional Tips:
Keep it Updated: Regularly review and update your Resource Page to ensure the links are still active and the information remains relevant.
Visually Appealing: Use clear formatting and consider using visuals like icons or images to make the page user-friendly and visually appealing.
Monetization Option: If you have affiliate relationships with some of the resources, you can disclose this and potentially earn a commission if readers purchase through your links.
FAQ Page
A blog’s FAQ (Frequently Asked Questions) Page is a dedicated section on your blog that addresses the most common questions your readers have. Here’s a breakdown of what it includes and why it’s an important page every blog should have:
Content of a FAQ Page:
List of Questions & Answers: A FAQ Page is a clear and concise list of questions you frequently receive from readers, along with well-written answers that provide all the necessary information.
Organization: Organize the questions logically by topic or category for easier navigation. You can also use a search bar if your FAQ page is extensive. A drop-down menu is another great option.
Benefits of an FAQ Page:
Improved User Experience: A FAQ Page anticipates readers’ questions and provides answers in a readily accessible format. This saves them time searching through your blog posts or contacting you directly.
Reduced Support Load: By addressing common questions upfront, a FAQ Page can significantly reduce repetitive questions, freeing up your time to focus on other aspects of your blog.
Boosted SEO (Search Engine Optimization): Including relevant keywords in your FAQ questions and answers can improve your blog’s search ranking for those specific queries.
Enhanced Credibility: A well-maintained FAQ Page demonstrates that you care about your readers’ understanding and that you’re proactive in addressing their needs.
Examples of FAQ Questions on a Blog:
The specific questions on your FAQ Page will depend on your blog’s niche, but here are some general examples:
For a food blog:
What are your favorite kitchen tools?
Do you have any dietary restrictions?
How can I substitute ingredients in your recipes?
For a photography blog:
What camera do you use?
How do you edit your photos?
What are your best tips for taking travel photos?
For a travel blog:
How do you plan your trips?
What are your favorite travel destinations?
Do you need a visa to travel there?
Tips for Creating a Great FAQ Page:
Identify Common Questions: Monitor your blog comments, emails, and social media interactions to identify questions that pop up frequently.
Keep it Updated: Regularly review your FAQ Page and add new questions as they arise or remove outdated information.
Clear and Concise Answers: Provide clear, informative answers that are easy to understand and address the question directly.
Consider Visuals: For complex answers, consider using screenshots, images, or infographics to enhance understanding.
Subscribe Page
A blog’s Subscribe Page (sometimes called a signup page or newsletter page) isn’t a standard webpage most blogs have. It’s a more targeted landing page specifically designed to convert visitors into email subscribers.
Here are the key elements of a good Subscribe Page:
Compelling Headline: A clear and concise headline that grabs attention and explains the benefit of subscribing (e.g., “Get Free Weekly Blog Tips!”).
Clear Opt-in Form: A simple and easy-to-use form where visitors can enter their email address.
Enticing Incentive: An offer that motivates visitors to subscribe, such as a free ebook, exclusive content, discounts, or early access to new posts.
Benefits of Subscribing: Highlight the advantages of subscribing, like receiving regular updates, bonus content, or access to a community.
Social Proof (Optional): Showcase testimonials from existing subscribers or social media follower counts to build trust and credibility.
Clear Call to Action (CTA): A button that stands out encourages visitors to subscribe (e.g., “Subscribe Now!”).
Why Subscribe Pages Can Be Valuable:
While not one of the most important blog pages every blog should have, Subscribe Pages offer several benefits:
Grow Your Email List: This allows you to connect with your readers directly through email, building a relationship and increasing engagement.
Targeted Marketing: With an email list, you can send targeted newsletters promoting your new blog posts, special offers, or products.
Increased Traffic: Emails can drive readers back to your blog, leading to more website visits and potentially higher engagement.
Optional Pages (Depending on Your Blogging Goals)
Write for Us
A Write for Us page on a blog is basically an open invitation for guest contributors to submit their work for potential publication on your blog. It outlines your blog’s guest posting guidelines and explains the benefits of contributing content.
Here’s a breakdown of what a Write for Us page typically includes:
Who You Are Looking For:
Briefly describe your target audience and the types of content that resonate with them.
Mention the kind of guest writers you’re interested in – established experts, up-and-coming voices, or a mix of both.
Guest Posting Guidelines:
Clearly outline your editorial process for guest posts, including topic suggestions, submission format, word count expectations, and turnaround times.
Mention any specific style guides or formatting requirements you have.
Benefits for Guest Writers:
Explain the advantages of writing for your blog, such as:
Increased exposure to a wider audience relevant to their niche.
Potential to establish themselves as thought leaders in their field.
A link back to their website or blog (valuable for SEO).
The opportunity to build brand awareness and credibility.
Submission Process:
Provide clear instructions on how writers should submit their guest post ideas or drafts.
You can include an email address or a link to a submission form.
Optional Elements:
Testimonials: Showcase positive feedback from past guest contributors to entice new writers.
Guest Post Examples: Include links to some of your best guest posts to give potential contributors a sense of the quality and style you expect.
Why a Write for Us Page is Valuable:
A well-organized Write for Us page can bring several benefits to your blog:
Fresh Content: Attracts guest writers who can offer new perspectives and expertise, enriching your blog’s content and keeping things interesting for your readers.
Improved SEO: Guest posts often come with backlinks to your blog, which can improve your search engine ranking and drive more organic traffic.
Content Creation Support: Guest contributions can lighten your content creation workload, allowing you to focus on other aspects of your blog.
Community Building: Guest posting fosters connections with other bloggers in your niche, potentially leading to collaborations or cross-promotion opportunities.
Important Note: While having a Write for Us page can be beneficial, be prepared to manage the numerous amounts of guest post submissions. It’s important to have a clear selection process to ensure the quality and relevance of the content you publish.
Portfolio
In some cases, your entire blog can function as a portfolio, especially if your niche is content creation itself. For example, a writer might use their blog to showcase:
Writing Skills: Different blog posts demonstrate their ability to write in various styles and on diverse topics.
Expertise: The blog content focuses on a specific field, establishing them as a knowledgeable source.
Client Testimonials (Through Comments): Positive reader comments can act as a form of social proof for potential clients.
Many bloggers, especially freelancers or those in creative fields like design, photography, or web development, include a dedicated Portfolio Page within their blog.
Here’s what a Portfolio Page on a blog usually includes:
Function: It shows your best work, achievements, or projects relevant to your niche.
Content:
Project Samples: Include appealing visuals like images, videos, or short descriptions of your best work.
Client Logos (Optional): If you’ve worked with any known brands or clients, displaying their logos can add credibility.
Brief Descriptions: For each project, provide a clear explanation of your role, the project’s goals, and the results achieved.
Case Studies (Optional): For more complex projects, consider including detailed case studies showcasing your process and impact.
Call to Action: Encourage visitors to contact you for further information or potential collaborations.
Benefits of a Portfolio Page on a Blog:
Attract Clients: A well-written Portfolio Page serves as a powerful marketing tool, attracting potential clients who can see your skills and experience firsthand.
Credibility and Expertise: Showing off your best work strengthens your credibility and positions you as an expert in your niche.
Easy Access for Potential Clients: Having your portfolio readily available on your blog saves them time searching for your work elsewhere.
Freebies
A Freebies Page on a blog is a dedicated section that offers downloadable resources or other benefits to readers in exchange for something, typically their email address. It’s a strategic tool used for lead generation and building an email list.
Here’s a breakdown of what a Freebies Page usually includes:
Content on a Freebies Page:
Compelling Headline: A clear and concise headline that grabs attention and highlights the value proposition of the freebie (e.g., “Download Your Free Blog Page Checklist!”).
Description of the Freebie: A detailed explanation of what the freebie is, what it includes, and how it will benefit readers.
High-Quality Preview (Optional): For visual freebies like ebooks or templates, include a screenshot or image preview to entice users.
Clear Opt-in Form: A simple and user-friendly form where visitors can enter their email address to access the freebie.
Limited-Time Offers (Optional): Creating a sense of urgency with a limited-time offer (e.g., “Download this free guide before [date]!”) can increase sign-ups.
Types of Freebies Offered:
The specific type of freebie you offer will depend on your blog’s niche and target audience. Here are some popular examples:
Ebooks: Short, downloadable ebooks on relevant topics can provide valuable information to your readers.
Checklists or Cheat Sheets: Offer condensed and actionable guides on specific tasks or processes related to your niche.
Templates: Provide pre-formatted templates for documents, worksheets, or social media graphics that save your readers time.
Stock Photos or Icons (For Creative Fields): Offer free, high-quality stock photos or icons relevant to your niche.
Webinars or Online Courses (First Module/Preview): Give readers a taste of a premium course you offer by providing the first module or limited-time access for free.
Benefits of a Freebies Page:
Grow Your Email List: Freebies encourage visitors to subscribe to your email list, allowing you to connect with them directly and build a loyal following.
Targeted Audience Building: Freebies tailored to your niche attract the right kind of readers who are genuinely interested in your content.
Increased Engagement: By offering valuable free resources, you keep readers engaged and coming back for more.
Lead Generation: Email addresses collected through freebie downloads become valuable leads you can nurture with future content and potentially convert into paying customers (if you offer paid products or services).
Important Note:
Deliver What You Promise: Ensure the freebie delivers the value you advertised to avoid disappointing readers and damaging your credibility.
Data Protection: Clearly communicate how you’ll use the email addresses collected through your freebie opt-in form. Comply with relevant data protection regulations.
Shop
A Shop Page on a blog site allows bloggers to sell products directly to their readers, transforming their blog into a mini e-commerce store. There are two main ways bloggers can set up a Shop Page:
Selling their own physical or digital products: Anything from handmade crafts, artwork, or clothing (physical products) to ebooks, printables, or online courses (digital products).
Affiliate marketing: Partnering with other companies to promote their products and earn a commission on each sale generated through your blog.
Here’s a breakdown of the key elements of a Shop Page on a blog:
Content of a Shop Page:
Product Listings: Each product should have a clear image, a descriptive title, and a detailed explanation of its features and benefits.
Pricing and Variations (Optional): Clearly display the price of each product, and if applicable, offer variations such as size, color, or format (e.g., ebook download vs. physical copy).
Clear Calls to Action: Buttons like “Add to Cart” or “Buy Now” that are prominent and easy to find.
Payment Gateway: A secure system for readers to purchase your products using trusted payment methods like credit cards or PayPal.
Shipping Information (Physical Products): Outline your shipping costs, estimated delivery times, and return policy (if applicable).
Trust Signals: Include customer reviews, testimonials, or security badges (e.g., SSL certificate) to build trust and encourage purchases.
Platforms for Creating a Shop Page:
WooCommerce (for WordPress): A popular and free plugin specifically designed for creating online stores on WordPress websites.
Shopify: A subscription-based e-commerce platform that offers a user-friendly interface for creating and managing online stores.
Etsy (for Handmade Goods): An online marketplace specifically for handmade or vintage goods where bloggers can sell their crafts directly.
Benefits of Having a Shop Page:
Monetization: Sell your own products and generate revenue directly from your blog.
Increased Reader Engagement: Offer valuable products that complement your blog content and keep readers engaged.
Build Brand Loyalty: Selling unique products can strengthen your brand identity and create a loyal customer base.
Data Collection (For Affiliate Marketing): Track affiliate sales and gain insights into your audience’s preferences.
Important Considerations:
Target Audience: Provide products that are relevant to your blog’s niche and target audience.
Product Quality: Maintain high-quality standards for your products or the products you promote to uphold your reputation.
Customer Service: Be prepared to handle customer questions and complaints, order fulfillment, and potential returns efficiently.
Conclusion
Having a well-structured blog goes beyond just creating great content. Essential pages like an “About Me” section and a contact form establish professionalism and build trust and connection with your readers.
This post covered the most important pages every blog should have as well as optional pages to consider for your blog:
Essential Pages:
About Me: Introduce yourself, your expertise, and your blog’s purpose.
Contact: Provide ways for readers to reach out with questions or suggestions.
Privacy Policy: Outline how you collect and handle reader data.
Disclosure: Be transparent about potential conflicts of interest with products or brands you recommend.
Valuable Pages:
Start Here (Optional): A roadmap for new visitors, best for complex blogs.
Resources: A collection of helpful links and information relevant to your niche.
FAQ: Address common questions your readers might have.
Subscribe: Encourage readers to sign up for your email list for regular updates and exclusive content.
Optional Pages (Depending on Your Goals):
Write for Us: Attract guest contributors to share their expertise and broaden your content.
Portfolio: Showcase your skills and experience, especially if your niche is content creation itself.
Freebies: Offer downloadable resources or other benefits in exchange for email addresses to build your list.
Shop: Sell your own products or promote others through affiliate marketing (if applicable).
Remember, the best approach depends on your unique blogging goals. Start with the most important pages every blog should have to establish a strong foundation, then explore valuable and optional pages to enhance your blog’s functionality and connect with your audience on a deeper level. By providing a user-friendly experience and valuable content, you’ll be well on your way to building a successful blog.
Ready to Captivate Your Audience with a WordPress Blog? Don’t be intimidated!
While the vast amount of online advice on how to start a blog with WordPress can feel overwhelming, it doesn’t have to be. This guide will empower you to navigate the process with clarity and confidence.
As a seasoned blogger, there were moments when I almost let the information overload discourage me. However, I’ve successfully transformed my creative outlet (think crafts, DIYs, and personal stories) into a thriving platform for lifestyle and frugal living tips. My blog seamlessly blends recipes with budget-friendly home hacks, all while staying true to my DIY roots.
Whether you envision your blog as a purely creative space for life updates and artistic endeavors, or a platform to establish yourself as a money-making authority, WordPress offers a powerful and user-friendly solution. We’ll delve into both options, equipping you with the knowledge to launch your ideal blog.
But before we explore the specifics of how to start a blog with WordPress, let’s solidify our understanding of the exciting world of blogging!
What is a Blog?
A blog, short for “weblog,” is an online platform where you can share your passions, expertise, or experiences with the world. They’re more than just digital diaries; according to a study by HubSpot, businesses that prioritize blogging see a 67% increase in leads compared to those that don’t.
Individual bloggers can also find success, with Statista reporting that over 465 million people worldwide actively follow blogs.
Blogs typically contain informative or engaging articles displayed in reverse chronological order, allowing readers to stay up-to-date on your latest content.
What is the purpose of a blog?
The purpose of a blog can vary depending on the creator, but some of the most common goals include:
Sharing knowledge and expertise: Many blogs focus on a specific niche, like cooking, travel, or gardening, and aim to provide readers with valuable information and insights.
Building an audience and community: Blogs can foster a sense of connection between the blogger and their readers. Comment sections and social media integration allow for interaction and discussion.
Establishing oneself as an authority: Consistent, high-quality content can position a blogger as a trusted source within their field.
Monetization: Blogs can generate income through advertising, affiliate marketing, or selling products or services.
Creative expression: Blogging offers a platform for individuals to share their passions, hobbies, or personal stories.
Driving traffic to a website: Businesses often use blogs to attract visitors to their main website and potentially convert them into customers.
Overall, the beauty of blogs lies in their versatility. They can serve a personal or professional purpose, entertain, educate, and even influence.
Can you make money blogging?
While blogging can be a fantastic avenue for generating income, it’s important to approach it with realistic expectations. Success is a journey, not a destination. Consistent effort, skill development, and high-quality content are the cornerstones of building a thriving blog.
Here’s what to keep in mind:
SEO and Ranking: Climbing the Google search ladder takes time. It’s unlikely your blog will land on the first three pages within just six months. However, by consistently creating valuable content optimized for search engines, you’ll gradually increase your visibility and organic traffic.
Investing in Your Platform: To unlock monetization options like ad placements, consider upgrading to a WordPress business account. This small investment ensures you have the tools and flexibility to turn your blog into a revenue stream.
Remember, dedication and continuous learning are key. As you refine your skills and establish your blog’s authority, you’ll be well on your way to achieving your financial goals.
The best way to start making money as a new blogger is through passive income. Displaying ads is nice, but it takes months (or longer) to start generating a higher income each month. If you’re going to rely on ads to make money with a blog, then you have to have tons of blog traffic coming in each month.
How much money do bloggers make?
The question of blogger income is a common one, and the answer is – it depends! Blogging success is built on dedication, not a quick buck.
While some bloggers see results faster than others, it’s important to set realistic expectations. Studies show that consistent effort is key – many bloggers take time to build a loyal audience and significant income.
Here’s a breakdown of some key factors that influence income:
Investment: Building a profitable blog often requires some upfront investment. Upgrading to a business hosting plan unlocks features like ad placements, a crucial monetization tool.
Time and Skill Development: SEO optimization and keyword research are essential for blog visibility. Fortunately, these skills can be learned over time with dedication (Neil Patel offers excellent SEO resources).
Now, let’s address the income spectrum. Blogger earnings can vary widely. While some may start with minimal income, success stories do exist. A hardworking blogger can make a little over $3,000 a month.
Remember, consistent content creation, audience engagement, and strategic optimization are the keys to unlocking your blog’s earning potential.
What is WordPress?
WordPress is a powerful and user-friendly platform that empowers you to create and manage your website or blog. Here’s a breakdown of its key features:
Content Management System (CMS): At its core, WordPress is a CMS. This means it simplifies the website creation process, eliminating the need for extensive coding knowledge. You can easily add, edit, and publish content through a user-friendly interface.
Open-Source Software: WordPress is free to use and modify! This open-source nature fosters a large and active community that constantly develops plugins and themes, offering endless customization options for your website.
Versatility: Whether you envision a personal blog, a business website, an online store, or even a complex membership platform, WordPress can adapt to your needs.
Beginner-Friendly: Getting started with WordPress is straightforward. A vast amount of documentation and tutorials are available online, making it easy for beginners to navigate the platform. (WPBeginner is full of great info!)
Scalability: As your website or blog grows, WordPress scales seamlessly with your needs. You can add new features and functionalities through plugins without needing to rebuild your entire website.
In essence, WordPress empowers anyone to build a professional and engaging online presence, regardless of their technical background.
How to Start a Blog With WordPress in 6 Steps
Choosing the right platform is crucial for your blogging journey. When it comes to user-friendliness and long-term success, self-hosted WordPress.org stands out for several reasons:
Unmatched Control & Flexibility: With WordPress.org, you have complete control over your website. This means you can customize everything, from design and functionality to monetization options. Unlike some platforms, you’re not limited by pre-set features.
Future-Proofing Your Success: If you ever envision monetizing your blog, WordPress.org is the clear choice. It allows you to integrate essential tools like advertising networks and affiliate marketing programs, paving the way for financial growth.
Avoiding Platform Migrations: Many bloggers who start on other platforms eventually migrate to WordPress due to its flexibility and power. This migration process can be time-consuming and even lead to lost content. By starting with WordPress.org from the beginning, you avoid this hassle and ensure your hard work stays put.
Bonus Tip: Before you start a blog with WordPress, it’s valuable to define your niche. A focused niche allows you to attract a specific audience and establish yourself as an authority in your chosen field.
By starting with a self-hosted WordPress.org blog and honing your niche, you’ll be well-equipped to build a successful and sustainable online presence.
Choosing a distinguished blog name sets the tone for your online presence. While it may seem daunting, a little brainstorming can spark creativity! Here’s a strategic approach to unlock the perfect name:
Know Your Niche: Before diving into names, define your blog’s niche. A focused niche allows you to brainstorm relevant keywords and craft a name that resonates with your target audience. Fitness enthusiasts wouldn’t be drawn to a blog titled “Cat Lover’s Corner,” but “Fit for Life” instantly conveys the theme.
Target Audience in Mind: Who are you hoping to reach? Understanding your ideal reader empowers you to choose a name with the right personality and appeal. Imagine the kind of language and tone that would resonate with them.
Spark Your Creativity:
Now that you have a solid foundation, let’s explore some brainstorming techniques:
Keyword Magic: Weave relevant keywords from your niche into the name. This enhances search engine optimization (SEO) and immediately communicates your blog’s focus.
Catchy & Memorable: Strive for a name that’s easy to remember and spell. Consider rhythm, alliteration, or wordplay to create a name that sticks.
Competitor Inspiration: Analyze competitor blog names for inspiration, but avoid direct copying. Look for naming trends within your niche to understand what resonates with your audience.
Beyond the Obvious: Don’t be afraid to explore unconventional names! Consider using a thesaurus, experimenting with abbreviations, or even incorporating a foreign language word.
Bonus Tip: Utilize blog name generators to jumpstart your brainstorming session.
After coming up with the perfect name for your blog, you need to make sure the name you want is available. These sites offer a free domain name search:
After you’ve found the perfect name for your new blog, you need to register it with a hosting provider. This is where your blog “lives”.
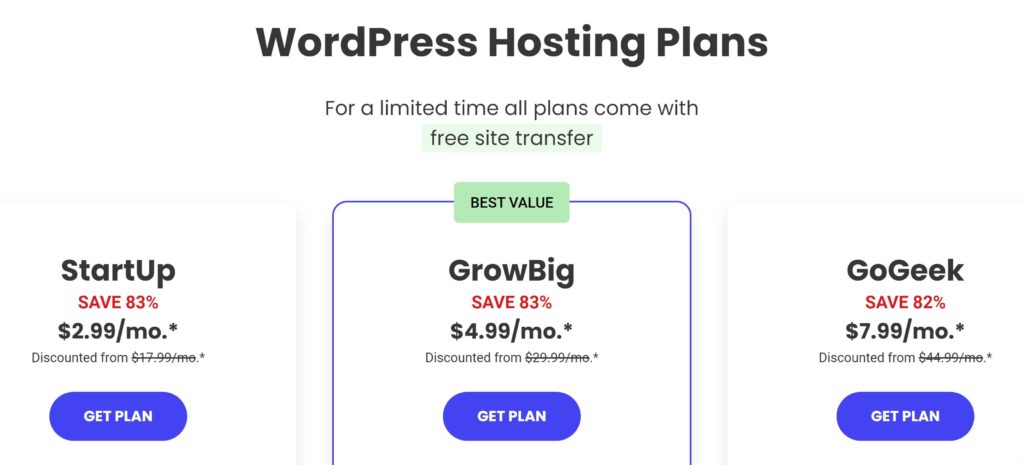
A great hosting site many bloggers use is SiteGround. SiteGround offers a comprehensive hosting solution specifically designed for WordPress users and online store owners utilizing WooCommerce.
Key Benefits of SiteGround:
Optimized for WordPress & WooCommerce: Experience seamless performance for your website or store, built with the unique needs of these platforms in mind.
Beginner-Friendly: Manage your website with confidence, even without extensive technical knowledge.
Powerful Tools at Your Fingertips: Benefit from a range of features designed to enhance your website’s functionality and security.
24/7 Support: Enjoy peace of mind knowing their expert support team is available around the clock to assist you.
Limited-Time Offers: Take advantage of special pricing currently available when you sign up for a SiteGround plan.
Installing WordPress on your hosting service is free. I’m not sure if all hosting services are the same, but Siteground has a setup wizard that makes the installation process very simple. They also offer three different ways to install WordPress:
Setup Wizard
App Installer
Manually
Learn more about how to install WordPress with Siteground here.
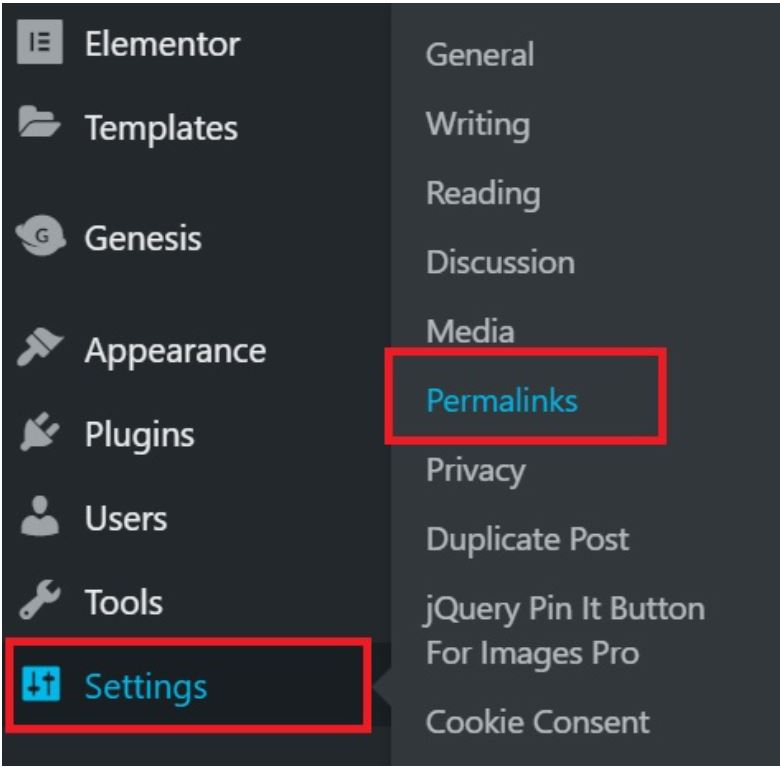
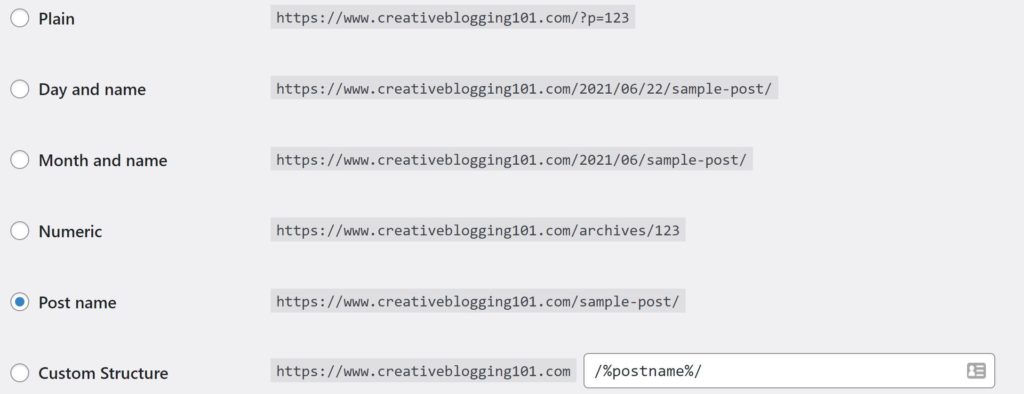
Important Tip: After installing WordPress, make sure you change how your blog links appear before you start writing blog posts. The default isn’t very user-friendly and is not good for SEO. You want to change the setting from the default to “Post Name”.
To change the settings, go into your WordPress dashboard, click settings, then permalinks.
Next, click the dot beside “Post Name” and then scroll down to save changes.
Now every time you publish a blog post, it will automatically appear as yourwebsite.com/post-title. This is easier for people to search for, better for Google, and better for SEO. It’s important to do this step as soon as you start a blog with WordPress.
Step 4: Pick a theme
Your blog’s theme acts as its visual identity, shaping your readers’ first impressions. It’s no surprise that selecting the perfect theme can feel overwhelming – with countless beautiful designs available, it’s easy to get swept away!
While I may not be a coder myself, I understand the struggle of picking just one. Here’s the good news: even without coding expertise, you can harness the power of themes to create a stunning and functional blog.
Where to find a theme: WordPress has a ton of free themes for you to choose fromand there are premium themes you can purchase as well.
Free themes: 1. On the WordPress Dashboard, go to Appearance > Themes > Add New Theme. 2. Search through all of the available themes until you find the one you want. You can preview themes before you install them to see what they look like in action. You can always change your theme later on. 3. Once you find the right theme for you, click the install button. 4. Click the activate button to apply the new theme to your site. Or you can test the theme with a live preview before you apply it to your site by clicking the live preview button.
Premium themes: Premium themes are themes that you pay for. These themes usually come with more features than free themes and some are updated more regularly. You can do a search for WordPress themes and you’ll get lots of results. One of the most popular places to get beautiful themes is StudioPress. Their Refined Pro Theme is one of my favorites!!
Bonus Tip: If you’re having a hard time choosing a theme, don’t worry. You can always change it later. Start writing a few blog posts and see how they look in different themes. You don’t have to worry about your theme as soon as you start a blog with WordPress.
This video is very helpful if you’re more of a visual person:
Step 5: Add plugins
Plugins are like mini apps that extend your blog’s functionality, adding valuable features created by third-party developers. When you start a blog with WordPress, remember: too many can slow down your website, impacting user experience and traffic. Here’s a strategic approach:
Prioritize Functionality: Focus on installing plugins that address specific needs and add genuine value to your blog.
Essential Plugins for Every Blogger:
Yoast SEO: This industry-standard plugin simplifies Search Engine Optimization (SEO), helping your blog rank higher in search results. We’ll dig deeper into SEO later, but for now, check out Yoast’s comprehensive guide.
MonsterInsights (Google Analytics): Track your blog’s traffic with valuable insights provided by Google Analytics. MonsterInsights makes integrating this powerful tool a breeze. Gain insights into overall traffic, visitor demographics, and where your audience comes from.
Step 6: Write excellent content
Congratulations! You have now started a blog!
Now it’s time to start writing some excellent content for your readers. However, it’s important to establish the essential elements that make your blog a welcoming and informative space before you start writing posts. These include:
Welcome Your Audience: Craft an engaging “About Me” or “Start Here” page that introduces you, your blog’s purpose, and the value you offer readers.
Transparency Matters: Include clear “Contact,” “Privacy,” and “Disclosure” pages. This builds trust and demonstrates your commitment to transparency. Businesses can benefit from adding a well-structured “FAQ” page to address common questions.
Show Your Face: Personalize your blog by adding a photo and bio. This humanizes your online presence and fosters a stronger connection with your audience.
Content is King (and Queen):
Now that your foundation is set, it’s time to focus on captivating content:
Consistency is Key: Develop a consistent posting schedule, aiming for at least one high-quality post per week. This keeps your audience engaged and coming back for more.
Answering the Call: Research your niche to identify questions your target audience has. Write informative and valuable blog posts that solve their problems and provide actionable solutions.
By establishing a strong foundation and consistently delivering valuable content, you’ll be well on your way to building a thriving blog community.
Bonus Tip: If you are struggling to come up with something to write about, here’s a list of suggestions for you.
After publishing your first blog post, follow these 6 steps to bring in traffic and gain a loyal audience:
Promote your blog
Track your stats
Link to older posts
Create 3-5 pins for Pinterest
Send out an email
Respond to comments
Conclusion
Starting a WordPress blog with these steps is straightforward, but building a successful and profitable blog takes dedication.
While ranking well on Google and establishing yourself within your niche takes time, don’t let that discourage you! It’s more like a marathon than a sprint.
Here are some key takeaways for how to start a blog with WordPress for new bloggers:
Embrace the Journey: Building a blog takes consistent effort and patience. Enjoy the process of learning, creating, and connecting with your audience.
Persistence Pays Off: Don’t be discouraged by initial hurdles. Stay focused, keep creating valuable content, and you’ll gradually see results.
Investing in Success: Some upfront investments, like a business hosting plan, can unlock monetization options and accelerate your blog’s growth.
Remember, with dedication, continuous learning, and valuable content, your blog can blossom into a thriving online presence that generates income. So, start your journey with excitement, and watch your blog flourish!
What happens next?
Congratulations on launching your blog and writing your first posts! Now, let’s explore strategies to attract readers and build a loyal audience, especially if you’re aiming for a monetized blog.
The First 6 Months: Content is Key
During this crucial initial phase, prioritize creating high-quality content that resonates with your target audience. Here’s what this involves:
User-Friendly Focus: Write engaging and informative content that’s easy to read and understand.
Formatting Matters: Utilize headings, subheadings, bullet points, and images to break up text and enhance readability.
The Power of SEO (Search Engine Optimization):
As you establish your content foundation, gradually incorporate SEO best practices:
Keyword Research: Identify keywords relevant to your niche and target audience. Carefully integrate these keywords into your posts without sacrificing readability.
Climbing the Google Ladder: SEO optimization helps your blog rank higher in search results, leading to organic traffic growth.
Remember: Consistent content creation, user-friendliness, and strategic SEO implementation are the cornerstones of attracting and retaining a loyal audience for your blog. By nurturing these aspects hand-in-hand, you’ll be well on your way to achieving your blogging goals.